Driftpin devlog: a new spin on bowling

This is Driftpin, a cute little bowling game with a new spin. I've been cutting my teeth on the Lua SDK with this project, and I think it's far enough along to share what I'm up to.

Driftpin Demo

The premise should be clear from the video: it's bowling, but you use the crank to control ball spin in order to navigate curvy lanes and various obstacles. It scores like bowling, but it plays a bit like a top-down fixed-screen racer. Each frame will play on its own unique lane, in the spirit of a mini golf course. I've got plans for up to 10 courses, each with their own distinct theme and obstacle types.

I've got the basics in place now — curvy gutters, ball control, boost functionality, and simple pin collision physics., as on this single lane. As you can see, right now the pins are just circles. This works convincingly while standing, less so once struck. I'm not sure what to do about that yet. I could swap the sprite graphic to look like fallen pins, but there's no way I can do proper collision physics for them and it might be more frustrating to see pins clipping through each other without colliding. :thinking:

Next I plan to build score tracking and then set up some form of scene management so I can start building and sequencing the lanes/levels. (I might try out Noble Engine, so any insights on doing that are welcome!)

24 Likes

Great concept! What does the inner part of the big circle mean?

Thanks! That's a first attempt at a "boost" meter. It charges as you corner at speed, and decays a little bit while not actively charging. Once full you can tap A/up for a speed boost that also impacts handling a bit, making it feel more "drifty."

That meter is my first attempt at conveying the spin direction/speed and boost. I'm not sure if the spin direction is critical, but since steering is relative to direction of movement and the crank axis is orthogonal to the screen I thought it might be helpful to visualize. I think a linear meter might be clearer for boost, but I wanted to see if I could keep the footprint small and utilize the otherwise wasted space within the spin meter. It also needs a lot of UX enhancements, including better indication of a fully charged boost, and possibly some indication while boosting that shows it depleting.

3 Likes

This is a really cool concept and can't wait to see how it's expanded on. I think the drift concept can be played with more within these style of games and the crank, it lends itself so nicely.

I was wondering what your thoughts are to level progression. How do you see the game developing for the player?

Thanks! I’m excited to explore the possibilities myself. I plan to create themed levels, each constructed around a particular set of obstacles and ideas. The levels will borrow from a variety of other inspirations, including mini golf, pinball, labyrinth, racing, driftkhana, skating, billiards, and so on. I’ll post updates here to showcase some of the level concepts as I build new obstacles.

In addition to the levels themselves, which I hope will offer a distinct feel and challenge, I plan to explore ball handling possibilities. Unlockable balls with unique stats — weight, charge, boost, drift, etc. — will hopefully mix things up, offer strategic advantages on certain lanes, and suit a variety of play styles. A timed challenge mode on each lane should provide some incentive to experiment with the available options.

1 Like

Keeping Score

Keeping score in bowling is tricky! Which is to say — I know how to keep score, but codifying it in an algorithm was more of a challenge than I expected going in. Getting the total right was one thing; making sure to call spares and strikes correctly even in the anomalous 10th frame took some doing. I'll share a bit about how I approached that below, but first: I put together a nice little scorecard to visualize the score, complete with proper notation, penciled in values for not-yet-final frame scores, and a circled total at game end. This GIF cycles through some randomly generated scores to showcase it.

Scorecard-5

Scoring Basics

In bowling, you score based on the number of pins knocked down in the fame — up to 10 — in (up to) two rolls. If you score all 10 pins in the first roll, it's a "strike" and the score in that frame is 10 plus the sum of the next two rolls (either in the next frame, or the next two frames, depending on whether another strike is rolled). If you score all 10 pins after the second roll, it's a "spare", and the value of the next roll only is added to the score in that frame.

The 10th frame adds complication since you can still attain those extra 2 rolls for a strike on the first throw, or an extra single roll for a spare on the second, for a total of 3 rolls (and up to 3 strikes) in a single frame.

Score Representation

There are a number of data representations that one might use to track the score. One literal option would be to keep track of the first and second roll in each frame (and a possible third in the 10th). Taking this approach requires iterating through the frames to compute the score for any given frame which represents a spare or a strike, looking one or two frames ahead respectively.

I took a different approach, opting to do the iteration backwards when recording a roll, rather than forwards when computing a score. I record each frame is as a list of (up to) 3 values in the range 0..10. I use a FrameScore object to hold this data:

function FrameScore:init(firstRoll, secondRoll, thirdRoll)
    FrameScore.super.init(self)

    -- nil values reflect not-yet-bowled rolls
    self.rolls = {firstRoll, secondRoll, thirdRoll}
end

In practice, values are only passed to init when loading saved game state. In a new game, they are all left nil to start, and they are populated in succession with calls to FrameScore:recordRoll(pins, forRoll). forRoll is actually optional as well (it allows for overriding score values) as by default it will record the first, then the second, and optionally a third roll. It also does some integrity checking to make sure you don't do anything illegal, such as record a third roll for a frame without a strike or spare, or record more than 10 pins total in a given frame. Apart from the various checks on the integrity of the data, the function basically amounts to:

function FrameScore:recordRoll(pins, forRoll)
    -- record the next roll unless otherwise specified
    local n = forRoll and forRoll or #self.rolls + 1

    -- integrity checks omitted…

    self.rolls[n] = pins
end

Here n is the roll number in the frame, which is determined automatically if omitted in the call to recordRoll. In addition to recordRoll(…), I have functions to check if the frame isStarted, isFinal (that is, all rolls which impact the score in the frame have occurred), isOpen (no strike/spare in the frame), isStrike, isSpare, and one to get the total scoredPins for the frame (which can be computed as the sum of the the fields within a single FrameScore object).

Then, I have a GameScore object which holds a list of 10 FrameScores, as well as some info about the current frame and current roll number.

function GameScore:init(data)
    GameScore.super.init(self)

    if data then
        self:deserialize(data)
    else
        self.currentFrame = 1
        self.currentRoll = 1
        self.strikeStreak = 0

        -- create our empty frame scores
        self.frameScores = {}
        for i = 1, NUM_FRAMES do
            self.frameScores[i] = FrameScore()
        end
    end
end

It has its own recordRoll(…) function which proxies to the current frame's recordRoll by default. Whenever this function is called, it will also iterate backwards from the current frame to any frames for which isFinal() returns false, recording rolls there as well to account for past strikes and spares.

function GameScore:recordRoll(pins)

    -- integrity checks omitted…

    -- iteratively update current and previous frames to account for strikes/spares
    local n = self.currentFrame
    while n > 0 and not self.frameScores[n]:isFinal() do
        self.frameScores[n]:recordRoll(pins)
        n -= 1
    end

    -- logic to update current roll and frame number omitted…
end

Both FrameScore and GameScore have serialize() and deserialize(data) functions which enable me to save the current state of the game, including the scores, the current frame, and the current roll. Separately, I have this same logic built for the PinRack in order to save the state of the pins themselves.

The 10th Frame

The approach I chose makes the 10th frame behave nearly identically to the other frames with regard to score representation, which is nice. The representation also makes it easy to implement the scorecard, since I can iterate without needing to "look ahead" as I render data for each frame. The score is just the sum of the recorded rolls in that frame, and the helper functions on the FrameScore object make it easy to check for strikes/spares and use the right scoring notation.

Determining when to show "strike", "spare", and "split" cards on screen in response to hitting the pins on any of the possible three rolls in the 10th frame was an extra challenge. Calling a strike on the first is easy. After that, things get messier. Knocking down all pins on the second roll could be a spare or a strike depending on the outcome of the first roll. I’d consider it a strike to knock down all 10 pins at once on the third roll; but is it a spare if you roll a strike on the first roll, fewer than 10 on the second, and the remainder in the third? Determining when to rerack in the 10th frame has similar complexity.

The key insight here was to check when scoredPinsThisFrame() % 10 == 0, which indicates the need for a rerack regardless of which roll it occurs on. A variation of this combined with checking the roll number is in place to determine when to announce strikes and spares. It feels a bit uncomfortable to have special cases in the code, but then again, the 10th frame is essentially a special case.

Up Next

I'm glad to have this bit of administrative work out of the way so I can soon turn attention back to building new obstacles, lanes, and courses. There's just one major technical hurdle I need to clear before the fun stuff: setting up scene management so I can logically structure sequences of lanes and manage transitions between various game states.

5 Likes

Loving this Dev log. And the game is right up my alley!

4 Likes

Detecting Splits

Here's a little diversion. I thought it would be fun to try out the SDK’s pathfinding APIs to detect splits. Although this doesn't have any direct impact on gameplay, I think that the game's ability to acknowledge celebratory moments (e.g. strikes, doubles, etc.) as well as cringeworthy ones (e.g. gutterballs, splits, etc.) will give it an empathetic voice and create a stronger emotional connection for the player. At the very least it should add to the atmosphere and sense of authenticity.

split

Wikipedia defines a split as:

…a situation in ten pin bowling in which the first ball of a frame knocks down the headpin ("number 1 bowling pin") but leaves standing two or more non-adjacent groups of one or more pins.

The Approach

That sounds like a graph problem! Restated in graph terms, we basically want to determine whether the set of pins that remain standing when the headpin is struck represent a fully connected graph, or contains two or more disconnected subgraphs. Some graph APIs have built-in facilities for determining this, which would make our job easy. Alas, Playdate does not. Its graph API, understandably, is focused on finding paths between nodes as would be useful in tile-based games or games played on a regular board.

No big deal; all the primitives we need are still there. The basic approach is to do a "flood fill" of the graph from an arbitrary standing pin in order to see if we can reach all of the others. If we fail to reach one or more pins, that means there must exist at least one pin which is fully disconnected from the subgraph we started from, and hence, a split!

Constructing the Graph

Before we can traverse the graph, we need to construct it. Bowling pins are arranged in a triangle. If you consider the 5 pin in the middle, it's clear that their layout actually represents a hexagonal grid, as it is adjacent to the 2, 3, 4, 6, 8, and 9 pins — a total of 6. The API provides convenience initializers for regular 2D grids (with or without diagonals — so, with 4 or 8 adjacencies) but none for graphs of degree 6.

hex-grid

Here’s the code used to construct the graph connections. It iterates through the rows and, for each node, creates connections to the node to its right as well as the nodes in the next row just to the left and right. This is sufficient since all connections are made reciprocal. The IDs for the nodes match the numbers of the pins. (Note that these directional references pertain to a rack oriented with the head pin facing downward, so you'll have to imagine the above image rotated 90º CCW. Note also that the graph has already been initialized and populated with nodes for each of the 10 pins before this step, which only happens once.)

local n = 1 -- the current pin number
for i = 1, NUM_ROWS do
    for j = 1, i do
        if j < i then
            self.g:addConnectionToNodeWithID(n, n+1, weight, reciprocal) -- right
        end
        if i < NUM_ROWS then
            self.g:addConnectionToNodeWithID(n, n+i,   weight, reciprocal) -- behind left
            self.g:addConnectionToNodeWithID(n, n+i+1, weight, reciprocal) -- behind right
        end
        n += 1
    end
end

The weight is always 1 (the pins are equidistant, although this doesn't matter for our purposes) and all connections are reciprocal. While it would be possible to update the graph in real time by adding and removing connections as pins are struck and reracked, in practice that felt like unnecessary effort with a risk of error. Instead, I reconstruct the graph based on the currently standing pins each time isSplit() is called by removing the connections for all struck pins from the fully connected graph we created above:

-- remove connections for pins which have been struck
local startPinID
for i, pin in ipairs(self.pins) do
    if pin.struck then
        self.g:removeAllConnectionsFromNodeWithID(i, true)
    else
        startPinID = i -- doesn't matter which, just any standing pin
    end
end

In the process, we capture a reference to a pin to start the traversal from. It doesn't matter which pin we start from — any standing pin node will do. After removing the nodes, we'd have a graph that looks something like this example split:

split-grid

Traversing the Graph

A flood fill can be achieved with either a depth-first or breadth-first search of the graph. I chose a depth-first approach, which can be easily implemented as a recursive function.

-- a simple depth first visitation function which returns the visited nodes
local DFS
DFS = function(node, visited)
    -- avoids the need to pass an empty visited list before recursing
    visited = visited or {}

    -- bail out if we've already visited or node is nil
    if not node or visited[node] then return visited end

    -- mark the node visited
    visited[node] = true

    -- visit all directly connected nodes
    local connections = node:connectedNodes()
    for _, c in ipairs(connections) do
        DFS(c, visited)
    end

    return visited
end

Let's break it down.

local DFS

First, we declare the local variable which will hold the reference to the function. This enables us to call the function recursively from within its own body.

DFS = function(node, visited)

The DFS function takes a playdate.pathfinder.node and the list of visited nodes which builds up as we traverse the graph.

visited = visited or {}

This line isn't strictly necessary. It provides an empty list of visited nodes by default, which means that the second argument may be omitted when calling DFS directly.

if not node or visited[node] then return visited end

This is the base case. If we've already visited the node, we bail out, otherwise we'd recurse infinitely. Checking for a nil node also handles the case where, for instance, there are no standing pins so we couldn't find a pin node to start from, avoiding the need to check for this outside the function.

visited[node] = true

We record visited nodes by inserting them into the table as keys with a value of true. This makes the lookup O(1), which doesn't matter much for such a small graph but still feels like the best approach, and also makes it possible to utilize the visited nodes later on.

local connections = node:connectedNodes()
for _, c in ipairs(connections) do
    DFS(c, visited)
end

Next, we fetch the list of all nodes connected to the current node. We iterate over those nodes, recursively calling DFS on each with the current list of visited nodes.

return visited

In the end, our traversal function returns the list of visited nodes. There are lots of other forms of visit functions we could create, including some that apply a function to each visited node, but the list of visited nodes is sufficient for the purposes of split detection. (In fact, we could have just counted them, but this approach seems more generically useful.)

Putting It To Use

Time to call it! We start the traversal from the node with the ID of our arbitrary standing pin. Once we have the list of visited nodes, all that's left is to compare the number of visited nodes to the number of standing pins. One gotcha here is in counting up the visited list. In Lua, the # operation is only well-defined for numerically indexed tables. Our visited list uses nodes as keys, so we have to use pairs (not ipairs, which also works only for numerically indexed tables) to iterate through them and come up with a valid count.

-- do a DFS over the pins starting from our standing pin node
local visited = DFS(self.g:nodeWithID(startPinID))

-- count the visited nodes
numVisited = 0
for node in pairs(visited) do numVisited += 1 end
local numStanding = #self:standingPins()

-- if we didn't visit every standing pin, it's a split!
return numVisited < numStanding

Implementation Notes

This approach works well for my needs. It’s worth noting that using the nodes as keys means that the resulting visited list doesn’t reflect the order in which the nodes were visited. It might also be nicer from an API perspective to return a numerically indexed list of nodes instead of the map, but that requires extra bookkeeping or an extra step with a helper function, and just didn’t seem worth it for my simple use case.

Summing Up

In ~40 lines of Lua code, I was able to implement my PinDeck:isSplit() function, which I call after each roll in order to show feedback to the player in the event of a split. That’s a little more code than I’d expected going in, but it works like a charm.

I could take this a step further and devise a way to detect specific types of splits too, such as the dreaded 7-10 or "goal posts" split (perhaps by defining bitmasks for each to compare with a bitmask representation of the standing pins?), but that can wait. I need to stop finding excuses to avoid the impending scene management work…

6 Likes

It's been a while. (Bought a house!) At long last, I'm finally digging back in, and I'd like to share a recent milestone: I made another level! That's not all that exciting in itself, but nonetheless it feels like a big step forward…

CurveLeftScreenshot

Lanes, Levels!

I just put a rudimentary system in place that allows me to both flexibly configure and then play through a series of lanes! Up to this point, I'd essentially just hard-coded a single lane right into my setup function and rolled with it. In fact, I built the ability to track the score over a full 10-frame game, but it essentially just re-ran setup, restarting the game each frame in every way but score tracking. I've been playing the same lane again and again…and again.

This is a huge accelerator since at last I can begin designing and testing levels. In turn, this will give me a sense of what it will feel like to actually play the game, rather than just a sense of the core input mechanics and collision physics I've been focused on so far.

Pondering an Approach

I spent quite a while thinking about the best way to approach level configuration. I have no experience building games of any real complexity, so I came to this problem green.

The vision for the game includes a series of 10-lane alleys (levels), each with a unique theme and obstacles. Many of those lanes/levels will still operate in a manner generally consistent with traditional bowling, at least with respect to a goal of smashing the ball into a standard rack of 10 pins at the end. However, some I envision to have unique pin arrangements, or boundary conditions like a timer that could run out, or other more eccentric features.

My desire for flexibility made it difficult to know how much of the logic to build into each level itself, and how much to leave to the game engine. I briefly considered a fully declarative level configuration format, but quickly decided it wouldn't afford enough flexibility. At the opposite end of the spectrum, I considered deferring entirely to the level to control everything; however, that could lead to a lot of code duplication, seemed more error prone, and overall didn't feel like a solid framework for building levels quickly.

Ultimately, I decided to keep the core "bowling" logic (pin rack, pinfall callbacks, scoring, etc.) in the engine, but use some OOP techniques to bundle up common lane logic to make them easier to build. Each level manifests as a subclass of the Lane class. This base class sets a bunch of defaults and does some basic setup required for any lanes using a standard 10-pin rack. At the same time, it allows pretty much anything to be overridden, including the position of the pins and terminating conditions for the lane.

The Lane Config

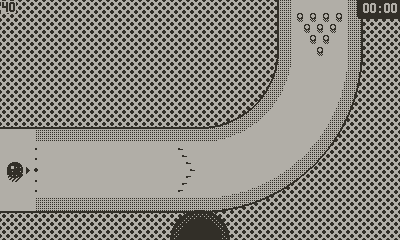
Here's what the lane pictured above looks like in code:

import "Lane"

-- a table of properties provides declarative configuration
class('CurveLeft', {
    backgroundImage     = "alleys/groovy-gutters/images/CurveLeft",
    defaultBallPosition = { x = 15, y = 170 },
    defaultAim          = Facing.RIGHT,
    rackPosition        = { x = 320, y = 20 },
    rackAngle           = Facing.DOWN,
}).extends(Lane)

-- a bare bones init
function CurveLeft:init()
    CurveLeft.super.init(self)
end

-- the engine provides the ball and pin rack to the level
function CurveLeft:load(ball, rack)
    -- the superclass positions the ball and pin rack for us
    CurveLeft.super.load(self, ball, rack)

    -- custom gutters and obstacles
    Gutter({
        GutterSegment(35, 135, 200, 135, false),
        GutterArcSegment(200, 50, 85, 180, 90, false, false),
        GutterSegment(285, 50, 285, 0, false),
    }, rack)

    Gutter({
        GutterSegment(35, 205, 200, 205, false),
        GutterArcSegment(200, 50, 155, 180, 90, false, false),
        GutterSegment(355, 50, 355, 0, false),
    }, rack)
end

-- return a reference to the lane class itself
return CurveLeft

It's fairly compact. I love that the second argument in the class definition accepts a table of key/value pairs to initialize class properties. (I initialize the defaults for these in the Lane base class in the same manner, rather than in init, so they can be overridden here.) This gives me the declarative feel I was after for the bits it makes sense for. There are a bunch of other properties defined in the superclass which may optionally be specified here as well, to override win conditions, set level timers, configure out-of-bounds tolerances, adjust aiming, etc.

init itself is uninteresting; the load function is where the custom level logic lives. Note that most lanes, including this example, also call load on super. I haven't used this technique in other Lua classes before (and the need to pass self as the first arg tripped me up at first), but this approach lets all standard 10-pin levels repurpose the same logic to set up the angle and starting location for the ball and pin rack. The base class sets them up according to the properties declared for the class above.

Next, the lane can set up any sort of obstacles it wants — gutters, bumpers, walls, etc. The setup could be a static config as in this example; or it could be randomized; create timers and animators; prompt for input; anything! (Side note: I might switch those gutter init functions to use table calling syntax so the arguments appear with named keys. It's easy to lose track of which number is which.)

There are also some lifecycle functions (not shown here) that the lane can implement to hook into events such as when the ball gets thrown, including an update function to run logic each frame.

I'll call attention to one other unusual thing, right at the end of the file:

return CurveLeft

This is outside of function scope, and instead gets returned directly when this file is imported. I'll come back to why I do this shortly, which brings me to the next topic:

Sequencing Lanes

Players will play through collections of lanes in sequence. I wanted a way to easily order them, and also associate some other metadata with each alley — name, level imagery, etc. Here's what I came up with:

local GROOVY_GUTTERS = {
    name = "Groovy Gutters",
    coverImage = "alleys/groovy-gutters/images/cover",
    bannerImage = "alleys/groovy-gutters/images/banner",
    scorecardImage = "alleys/groovy-gutters/images/scorecard",
    lanes = {
        import "groovy-gutters/lanes/S_Curve",
        import "groovy-gutters/lanes/CurveLeft",
        import "groovy-gutters/lanes/U_Turn",
        -- ...
    }
}

local THE_BANKSHOT = {
    name = "The Bankshot",
    coverImage = "alleys/bankshot/images/cover",
    bannerImage = "alleys/bankshot/images/banner",
    scorecardImage = "alleys/bankshot/images/scorecard",
    lanes = {
        -- ...
    }
}

-- ...

ALLEYS = {
    GROOVY_GUTTERS,
    THE_BANKSHOT,
   -- ...
}

This gives me a nice declarative way to both provide level metadata and sequence lanes. I'm intentionally using descriptive names for each lane so they are easier to identify, and so that I can trivially shuffle their order as I build and test them. First I define each alley in its own block, and then those alleys themselves are sequenced at the bottom of the file to determine eventual level ordering.

A notable twist here is my use of the import calls for each lane right within the declaration of each alley. This avoids the need to reference each lane twice: once at the top of the file for import, and again to specify the name of class within each of those files when declaring their sequence. Returning the class directly at the end of each lane's file enables this pattern. Note that I'm storing a reference to the lane class itself in these lists; not instances of them. They don't get instantiated until just before they get loaded, which I can do without even needing to know the name of the class for each lane, e.g.

currentLane = lanes[currentLaneIndex]() -- instantiate
currentLane:load(ball, rack) -- load

There's still some rough edges to iron out, but the critical ability to start building level content is a game changer, and I'm excited for what comes next!

3 Likes

I'd buy this game! :grin:

2 Likes

A little wobble

Side projects move in fits and spurts, but I've been making more progress of late. Today I'd like to show off a fun little detail I just added: wobble.

wobble3

I remain conscious of the fact that the pins (and their collision physics) are just circles right now. And yet, the more I play around with it as is, the less I feel that building more realistic falling pin physics is essential to the gameplay. (On that note, I do treat struck pins as having a diameter ever so slightly larger to probabilistically make the pinfall feel more fair in practice, but you'd never know; on the contrary, it's obvious at a glance that the pins don't even appear to fall over when hit. Feedback on this point is most welcome…)

Today's little diversion from core gameplay arrives with intent to help players suspend their disbelief just a bit more regarding the nature of the pins through the use of a neat little wobble effect. When a pin is struck by another (or the ball) at a low enough velocity, it will remain standing and the force is instead translated into a sinusoidal wobble.

I could have done this with a sprite sheet, but I figured that the calculations for a simple simulation wouldn't be any more CPU intensive than the collision logic itself, so why not add a little more dynamism? Both the magnitude and direction of the strike which initiates a wobble carry over into its amplitude and axis, which really adds to the effect. I also added a decay to the wobble period so that it gets faster as the pin settles (which is not how pendulums work, but seems to be an effect seen when an off axis cylinder with some rotational wobble comes to rest).

To be clear, this is totally phake physics. I don't even know how to look up the physics I describe, and I imagine an actual simulation of it would be needlessly complex (feel free to correct me on this)! That said, I think it achieves a pretty convincing effect that makes it feel a lot more like pins and a little less like one might be bowling for billiards. :sweat_smile:

More substantive updates on the way soon…!

Oh, and one last aside: you may have noticed that the wobbled pins shift a pixel or two, but then snap back into place suddenly as all the struck pins disappear. A future fun diversion will be to create a little pin sweeper animation/simulation to run in the background while the result is displayed, but there's lots to do before I come back to that!

3 Likes

Ready, aim, bowl!

Here's a more substantive update, as promised! I've added support for positioning, aiming, and setting a power level before throwing the ball. This makes it both look and feel dramatically more like an actual game than the prototype it's been up until now. The added flexibility also makes some levels easier to navigate than before, which is a good thing — the limited screen space requires some tight turns which can be punishing when faced right off the foul line like the level shown here.

Ready Aim Fire 3

As the (also new) action bar suggests, you can use either the D-pad or the crank to dial in each property. A and B buttons move forward and backward through each step. The position, aim, and power level are preserved while doing so, and also for subsequent balls in the same frame, so it's easy to make small adjustments as needed.

Marching Ants

Each little UI widget makes use of some marching ants to visualize the property being set. It was satisfying to use the EasyPattern utility I'd previously built to create the effect with very little effort.

A little design detail I'm quite pleased with is that the ants march in opposite directions from the ball while positioning, and from the reticle while aiming, to emphasize the affordance. This required a little extra logic to ensure that they move in the correct direction regardless of which way the foul line is facing, but the result is certainly worth it even though players may not even notice.

Power Play

I'm quite satisfied with the position and aim widgets; less so the one for adjusting power, which I consider more of a placeholder. I'm also less certain about the interaction mode for adjusting power. As implemented, players can choose one of 5 discrete power levels for each throw. This contrasts with the free movement of the other two parameters.

I chose this approach in part because I envisioned a UI widget which displays a series of small triangles extending from the ball in the direction of aim which appear/fill as the power level increases. I'm not sure if that's the right UI, or the right constraint for adjusting power.

In addition to offering continuous power control, I've considered…

  1. Adapting a technique from arcade golf games with a timing-based approach. This would entail some sort of animated power meter, and a timed button press to throw the ball with the current power, perhaps even with a second press to control accuracy in the form of a slight variance from intended aim, a bit of unexpected spin, or both.
  2. Something akin to a Wii bowling approach, wherein the player must pull back the crank and swing it forward to release. The power would depend on some combination of the pullback angle and the speed at which the crank crosses the 180º (down) position. This could be fiddly, requiring a multi-step UI to instruct the player. It could also interfere with the roll a bit by adding unwanted spin when starting the throw — or maybe that's a nice analog to real life?

Anyway, lots of unknowns on this point. The gameplay is heavily focused on spinning the ball to control it as it rolls down the lane, and I'm unsure whether these additional elements would add or detract. At some point I'll spend some time prototyping a few approaches to see what fits, but for now I'm going to finesse some levels and build some new ones to take advantage of this new capability.

3 Likes

Level design workflow

I recently finished creating the first full 10 lane alley (course) in the game! I figured I'd celebrate the milestone by sharing a bit about my level design workflow and offering a peek at the lanes.

I do all of the actual design layout in Figma. This makes it really easy to mess around quickly and see whether an idea in my head translates well on screen. I created a few simple components for the pin deck, the foul line area, and gutter arc segments to speed things up. Here's what the 10th lane looks like in Figma:

Here's the same lane with the arc segments highlighted so you can see how the gutters are constructed of both straight and curved pieces. I'm sure there's a sensible way to support arbitrary Bézier curves instead of limiting myself to straight lines and arcs, but this approach keeps the collision logic simple and likely incurs less of a performance penalty at some loss of flexibility.

This system still gives me a lot of creative freedom. In the early courses I've worked on so far I've maintained a consistent lane width and all arcs fall on multiples of 45º, but neither of those constraints are inherent in the system. I expect to get a bit more experimental in the future.

Once I'm satisfied with the layout in Figma, I manually translate the design into code. It would be slick to automate that step — at some point I might investigate whether I could write a Figma plugin (anyone done this?) to do the work for me. That said, it only takes about 5m to code up a new lane once I have a design. Here's what a length of gutter looks like:

    Gutter({
        GutterSegment {
            x1 = 27, y1 = 195,
            x2 = 27, y2 = 105
        },
        GutterArcSegment {
            x = 112, y = 105, r = 85,
            startAngle = 270, endAngle = 405
        },
        GutterSegment {
            x1 = 172, y1 = 45,
            x2 = 273, y2 = 146
        },
        GutterArcSegment {
            x = 284, y = 135, r = 15,
            startAngle = 225, endAngle = 90
        },
        GutterSegment {
            x1 = 299, y1 = 135,
            x2 = 299, y2 = -15,
        },
    }, rack)

I've reworked the format since my last post on the matter, enabling table-calling syntax with named keys. It's less concise, but it greatly aids legibility and also makes it more easily extensible. The relative order of the points (for straight segments) and angles (for curved segments) is important: gutters are directional so that I can apply a slight force along them to direct a guttered ball toward the end of the lane.

Once I've created a new level I'll fire it up in the game to test it. At first, it looks like this:

ZigZagNoBG

I also added an "outline" render mode which I can enable:

ZigZagOutline

This serves two purposes. First, it makes it a bit easier to see the exact positions of the gutters and tweak any values that might be off due to rounding errors. Second, I use a capture from this mode as a starting point for creating the background image for the lane. The gutters are drawn dynamically, but the rest — lane markings, borders, backgrounds, etc. — are all baked in.

Put it all together, and you get the final result:

ZigZagFinal

I plan to explore ways to make the world a little more dynamic at some point. I might add some additional environmental objects, and/or some subtle animated elements. But that all comes later.

Here's a peek at the first full course in the game (as it exists right now, but subject to change with play testing and difficulty balancing), as well as some of the second "standard" alley already in progress. You can really see how the design constraints I'm working with yield a consistent visual language for the lanes so far. Even so, and despite the small display and my intent to keep things fixed-screen, there's a lot of layout potential. Beyond these first couple of alleys, I'll start to introduce additional obstacles and other elements to mix things up — stay tuned!

7 Likes

Awesome work!! I need this gameee

1 Like

It’s all relative

Like many classic fixed-screen racers, Driftpin uses relative steering. Relative steering is something one has to get used to. When I say relative steering, what I mean is that the direction of rotation is relative to the body in motion — commonly a car; in this case, the ball — rather than the "absolute" frame of screen. (For the purposes of this discussion, the player is presumed to remain fixed with respect to the screen!)

To turn left, press left; to turn right, press right. That’s easy to reason about when the object is facing forward (up), as the relative and absolute frames align. However, if the object is facing downward, then pressing left will cause it to turn to its left, which is right relative to both screen and player.

The crank adds another level of indirection into the mix. Because it rotates orthogonally to the screen, there is no obvious "left" or "right" mapping. In fact, it’s better to think of it as clockwise or counter-clockwise movement, but the orthogonality still makes it hard to reason about in the heat of gameplay.

Driftpin is just a fun little arcade game; it’s not supposed to pose abstract spatial reasoning challenges! I’ve put in place two features to attempt to alleviate this:

  1. An option to invert the crank direction
  2. Upcoming curve indicators

Up means…up?

Inverting Y-axis look in video games is an ongoing and heated debate. The majority of players prefer to press up to look up, but a significant minority (myself included) find it more natural to press up to look down, and down to look up. When games release without an option to invert the Y axis, they often meet sharp criticism, and some players may simply pass on the game.

A similar principle likely applies to the crank, so it’s a no-brainer to add the ability to invert the crank direction. Right now this manifests as a checkbox in the system menu so it can quickly be toggled mid-game.

Crank Direction (…get it? :sweat_smile:)

The option to invert the crank helps, but doesn’t fully resolve the mapping issue. It's easy to crank the wrong direction in the heat of gameplay and veer into a gutter. I wanted to provide a visual cue to help players avoid that frustration, so I added upcoming curve indicators in the form of animated chevrons in the lower-right corner of the screen:

Chevrons

The placement of the chevron aligns the graphic with the position of the crank itself to reinforce the connection (this is also why it’s partially offscreen). I also went through a number of iterations for the appearance of the graphic before settling — at least for now — on the one shown above. At first, I used a flat graphic:

chevron-table-19-50-1

The flat graphic was unexpectedly ineffective. Why? Because it suffers the same mapping issue! I didn't realize it until I saw it in action, but deciding which way to crank when the arrow pointed down wasn't obvious. You might assume that the arrow should reflect the direction of the crank when it's nearest to you. However, I found that the starting position of the crank when observing the indicator dramatically impacted the momentary mental mapping: if the crank was angled slightly toward the player, down mapped naturally to "crank towards me" (backward, according to the official playdate lexicon), but if it was angled slightly away, it mapped to "crank away from me" (officially: forward), since that was the shortest path to "down" from it's current position.

I've attempted to overcome this by giving the indicator a 3D perspective effect. Hopefully this makes it clear that the indicated direction reflects the movement of the crank as it’s rotating near to the player, rather than away from them.

chevron-table-19-55

Since gameplay is fast, I also wanted the indicator to remain effective even in one's peripheral vision. The animated chevrons help emphasize the direction of motion (though I do tone down their speed when the reduce flashing option is enabled).

Implementation Nerdery

The implementation of the chevron is fairly simple, and takes advantage of a quirk of the sprite system which allows the collision rect to be set independent of the sprite’s location. This feature is primarily intended to enable reducing the size and adjusting the position of the collision box with respect to the sprite graphic to make collisions feel more "fair." However, nothing prevents us from specifying arbitrary collision rects that are wholly disjoint from the sprite’s size and location!

By exploiting this fact, I can set up regions of the screen that the ball collides with while passing through, which correspond to an instance of the chevron graphic which always remains positioned in the lower-right corner. Here’s what it looks like:

31dbbf12-e5b4-4497-bf81-829fe151090d

As you can see, there are two separate chevron sprite instances on this lane. Both are positioned in the lower right, as indicated by the animated dotted outline (the dot is its center point, which I align with the crank at the right edge). However, their collision rects, shown in solid lines, overlay areas of the lane preceding major curves. When constructing a chevron, I just pass in the location and size of the intended target area and then construct a collision rect offset from the sprite in world space.

At first I thought these indicators might appear as part of a tutorial or training phase, but they are so useful that I now plan to keep them everywhere, with an option in settings to disable if players find them distracting.

2 Likes

Thank you for the update! I'm really excited for this game :pleading_face:

1 Like

Tutorial Time

With the first full alley in place, I took a step back to consider a tutorial before moving on to additional alleys. I planned to add one eventually, and I decided that building it up front will make it easier to do some casual play testing. At first I expected to create a simple 3 part tutorial to cover 1) throwing basics, 2) spin, and 3) boost. In the end, I wound up with a full 10 lane tutorial "alley!" The lessons are bite-sized and quick to complete, so I think it works nicely.

Tutorial - Spin

Gooooaaaaaalll!

Although the tutorial takes place on a series of lanes that look much like those in the main game, I decided to remove the pins to help focus the player on the mechanics being taught in each lesson. In lieu of the pins, I've created a checkered pin deck area. The goal in each tutorial lane is simply to reach it. There are still a handful of ways to fail (gutterball, etc.) and in these cases the whole lane just resets after a very brief delay so the player can try again. This keeps the tutorial nice and snappy.

Tutorial - Reset

I also like that this approach helps the tutorial stand apart from the main game. This will extend beyond the intro, allowing me to easily add tutorial lanes to future alleys to provide alley-specific lessons, while maintaining a clear distinction between tutorial and gameplay.

Diagetic Text

For simplicity I aimed for concise explanatory text that I could position within the context of the lane itself, rather than relying on popups or overlays that need to be dismissed. This drops the player right into the action without need for interstitial screens, and keeps the instructions at hand for reference when the player needs multiple attempts to reach the goal. It does mean I can't get into some of the nuances of the gameplay, but that may be for the best — those can be learned through play as well as the hints that appear while the scorecard is displayed.

It falls a bit short of looking like true "in world" typography — as though painted onto the floor, for example — but that's the vibe I'm going for. (This effect is tough to convey in a static, top down view!) On the topic of typography, I created a custom font and crank/button glyphs to use here. Right now everything is set in uppercase, which works okay, but I might go back in and add a lowercase character set to see if it improves legibility.

Ribbons

A few of the tutorials require moving at speed, such as a short sequence dedicated to learning how to boost. Unlike the other lessons, just reaching the goal isn't enough. I wanted to illustrate this requirement visually so that the goal is explicitly expressed in the design of the lane, rather than a hidden abstract idea.

Tutorial - Boost

Enter: ribbons! I thought breaking through a ribbon before entering the goal would provide a clear representation of the task at hand, and just be plain fun to do. It also affords an obvious signal for failure: if you aren't going fast enough, you just bounce off…

Tutorial - Ribbon Bounce

At first this essentially functioned as a speed gate. However, I've since refined it to require a specific force in Newtons to clear. This means that it responds differently to balls of varying weights (though for the tutorial the standard ball will always be used). I'm also calculating the force with respect to the direction of motion of the ball, which means you're more likely to bounce off if you hit at an angle.

I might have gone a little overboard with this particular obstacle. I invested a fair bit of time in some stylized response animations. When breaking the ribbon, the point at which it breaks depends on where the ball hits it, and the pieces come to rest differently each time; when bouncing off it, the amplitude reflects the actual force of the bounce. I may still go back and add a little "snap" graphic, or confetti-like particle effect for a little extra flair.

I'm really happy with how they turned out, although I may ultimately have to abandon most of that dynamism if I need to bake it into an image table for performance reasons. We'll see. It'd be nice if I can avoid that, both because the dynamic responses are fun, and because the current approach lets me set up ribbons of arbitrary lengths and angles by specifying the points for the posts independently. :crossed_fingers:t3:

Anyway, these work perfectly in the context of the tutorial. That said, they're so much fun that I can see using them again, either in future levels, or perhaps as some sort of "new game +" element that places ribbons at strategic spots on existing lanes to increase the challenge.

6 Likes

Hey folks, here's a heads up that I'm shifting discussion over to discord. I may still post long form updates here occasionally, but head that way to join the conversation and follow along with day-to-day progress. Hope to see you there! :wave: