A strange yellow device lies half hidden in the weeds beside a road you never noticed before.
If you find it, don’t pick it up.
It is not for you.

The device identifies itself as a “K5 Panopticon Receiver” developed by the mysterious Cristina Roccati Institute. It presents you with some cryptic warnings, mysterious incoming "radio" signals, and a massive scrolling “psychic image” full of surreal and disturbing things.
Who sent the signals, where is the image from, and what is going on? What will you discover? Probably nothing good… Don’t play in the dark!
OUTSIDE PARTIES is a “hidden picture”/“hidden object”-style horror scavenger hunt, coming to Playdate in 2023. (Much work remains—the artwork is full-res but it’s just rough test art. All details are subject to change!)
Follow me on Itch or Mastodon for updates.
Imaging Engine
This screenshot is a portion of a 1442-megapixel image, cropped to the Playdate screen (400x220 plus a 20-pixel UI bar). That’s right, nearly 1.5 gigapixels of imagery like this.

It’s not a 1-bit black-and-white image. It’s a grayscale HDR image dithered to 1-bit on the fly. You can adjust the dynamic range in realtime with the crank, choosing whether to bring out details in the shadows, the highlights, or anywhere in between. The image’s grayscale data extends well beyond the range visible at any one time. (Spooky "glitches" are intentional!)

The image is a 360° panorama (flat, no warping). A long strip that wraps around horizontally. The tiny red rectangle here is the visible portion of the blue pano. The image is 256 Playdate screens wide by 64 screens tall. That makes it about 15.1 x 2.1 meters, or 49.4 x 6.8 feet. Equivalent to about 16.5 standard exterior (36-inch) doors side by side, all at Playdate resolution. Larger than the floor of a standard 40’x8’ shipping container.

Horizontally, you can pan forever. Vertically, you will hit the top or bottom… if you scroll far enough. Luckily, you can zoom in and out with (A) and (B) to get around faster.

The magnification numbers refer to “how many screens tall” the image is. So at “1x” the panorama matches the screen height (and you can see 1/4 of the width at once). At “.5x” minimum zoom—depicted below—the panorama is 1/2 the screen height, and you can see 1/2 of the width at once. So you can travel 180° to the far side of the panorama in moments. The red region is the maximum visible portion when zoomed out. The blue is the entire image.

You can pan freely with the d-pad, even diagonally. Since the image is so wide, I made horizontal movement go in 20% larger chunks. (I limited the Simulator framerate to reflect what you get on actual hardware.)
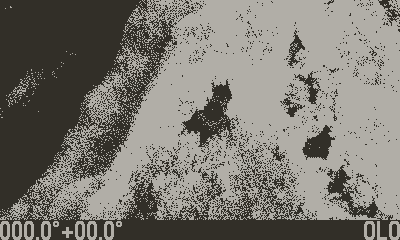
The HUD shows your coordinates on the image, measured in degrees of azimuth and elevation. (0° is “North.” The vertical field of view is 50°, ± 25°.) And while turning the “phase screw” (a.k.a. crank) the “noumenon phase” (dynamic range setting) is displayed for reference.
If you are zoomed in near the top or bottom, and then zoom out from there, it’s inherently not possible to remain centered on that portion near the edge (since the image won’t ever overscroll past the edge). But you won’t lose your place: zooming out remembers where you came from, and will zoom back in accordingly. You can also jump “home” to dead level at due North at any time from the System Menu.
At the bottom of the screen you can always see the live transcript of incoming signals, whether useless fragments, or—as you zero in on a signal—coherent messages. (But from who?) Everything you do visually also has an audio component: you are tuning “psychic radio signals” using the image as reference. Tuning the audio and tuning the image are one and the same process.
The “Signal Log” screen (design is only a placeholder!) is a growing list of items where you select which one to hunt for, or re-visit items already found. Access the Signal Log by pressing (A) + (B) together, or from the System Menu. [EDIT: those aren't the final methods I landed on. Instead, you keep pressing B to zoom out "past the minimum," OR long-press B to quickly get to the Signal Log without losing your zoom. And I added "LOG" on the left of the zoom scale to make it discoverable.)

How Does It Perform on Hardware?
Quite well!
The game’s image pipeline processes around 100 images on the fly to get to what you see on the screen. Different parts of the screen are sometimes generated in different ways.
I’m working on a detailed post about that pipeline, but for now, here are a few details:
• The entire image is loaded at launch, not streamed from disk.
• Nothing is generated procedurally, or assembled from parts. The “hypnopanorama” really does come from a single massive Photoshop document. Hundreds of MB. Simply exporting the file takes several minutes. (Bad Adobe!)
• Everything is coded in 100% Lua! No C. I like the streamlined Lua workflow with Panic Nova, plus I didn’t feel like learning yet another new language. Nor did I want to fold in third-party libraries. (Some cool C libraries exist for grayscale images, but my HDR scheme called for a custom solution.)
• My original attempt at this concept was simple, elegant, and would have taken several MINUTES PER FRAME to run. So elegance and “conceptual purity” had to go out the window. I focused on what the player will actually see and experience, and started cutting every corner I could think of without compromising that. I hacked around things in shameful ways with ugly side effects, then coded mitigations to hide the side effects. I made things fast when I could, and when I couldn’t, I worked to make them FEEL fast.
• The image pipeline grew to around 100 steps… more conditionals, more corner cases, more weird visual artifacts to address… yet it kept getting faster and faster.
How Does It Work?
Doing more with less data = speed! I’m surprised by how good this photographic style of imagery is able to look, using far less data than I would have predicted.
In the end, that 1.5 gigapixel HDR image fits in a PDX a little over 6 MB. (I haven’t done the audio yet, so that will grow some.) And it holds steady at about 60% usage of the Playdate’s RAM.
At max magnification (64 screens tall x 256 wide), every 64-pixel zone of multi-bit HDR grayscale imagery is stored internally as just THREE BINARY DIGITS of data.
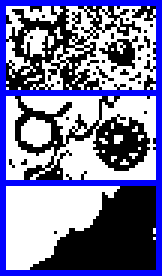
That animation shows the full dynamic range of the grayscale panorama. That portion of the panorama is derived from those three little 1-bit data sets framed in blue. Every set of 3 source bits becomes 64 rendered pixels—including each of those rendered pixels having its own HDR range of dark-to-light values to crank through.
It’s still a lot of bits total, though, considering that this view is only 1/16,384 of the overall image!
Example “Recipe”
There are actually 6 sets of 1-bit source data, but only 3 are used at a time. The visible image is generated from those 3 sets of bits using numerous different "recipes," incorporating three different dither types that need to interact—including several pre-defined 128x128 blue noise patterns which are themselves tweaked to interact properly with each other. Here's the recipe used to generate the image above when the crank is at "PHASE VII.6":
Component A
1. Draw the inverse of bit set #2
2. On top of Step 1, composite bit set #1 with 33% blue noise
Component B
3. Draw bit set #3
4. On top of Step 3, composite bit set #2 with black transparent
Component C
5. On top of Component A, composite Component B with white transparent
Component D
6. Draw bit set #3 again
7. On top of Step 6, composite bit set #2 with white transparent
8. On top of Component C, composite Step 7 with black transparent
Component E
9. Draw pure black fill
10. On top of Step 9, composite bit set #2 with 67% blue noise
11. On top of Step 10, composite bit set #1 with 50% blue noise and white transparent
12. On top of Step 11, composite bit set #3 with black transparent
Component F
13. Take Component D and apply .5-pixel blur using Atkinson dither
14. Take Component E and apply .5-pixel blur using Atkinson dither
15. On top of Step 13, composite Step 14 with 27% Bayer 8x8 dither
Then periodic random “glitch” effects are added to the result.
Many of these steps are done only for the portion of the image that changes. The rest is re-used and translated to new coordinates. For example, when panning diagonally, two strips are rendered: a horizontal strip and a vertical strip in an "L" shape. The dimensions of the strips vary as needed, to composite cleanly with the existing render and avoid seams and artifacts. Sometimes extra edge pixels must be rendered for this reason.
I optimized first for smooth cranking (it’s super fast), then for panning performance, and lastly for zooming (the least frequent action).
Game Play
Game play will consist of exploring and getting to know this strange, detailed image. Early signals will be easy to find. Then, as you get to know the image better, that knowledge will help you track down less obvious signals.
Four main things set OUTSIDE PARTIES apart from conventional “hidden picture” games:
1. Dynamic range: “tune” the image on the fly (by cranking) to brighten dark areas or dim bright ones, revealing things otherwise lost in shadows or glare.
2. Audio and text “signals” that are tuned at the same time you tune the image. (This is inspired by “numbers stations”—possibly including spoken words, but that’s not yet definite.) This tuning action provides a kind of “warmer/colder” guidance to zero in on an item once you get close. And tuning does not require the sound be turned up: the live transcript lets you visually see a signal increasing in clarity as you locate and tune it. Zeroing in like this is useful when other clues leave you stumped, but it doesn’t hold your hand: you must choose one signal (target item) at a time to track down. You can browse the list of clues and change your target at will, but you can’t “accidentally” get credit for stumbling across other items.
3. One MASSIVE panning/zooming scene with many items to find, instead of multiple small scenes to search. No scene loading delays or interruptions—a single experience. The list of target items starts small and simple, but the signals you track down unlock additional signals in turn, providing clues to further items. To “acquire” an item, you must zoom in to it, tune it to clarity, and then wait for the looping signal to play through once. (They’re not long.)
4. Varied “clue” types instead of a simple list of items. Signals can provide one or more of the following clues, so some targets will be easier to find than others:
• A clear name or description
• A vague description or hint
• A trail you must follow across the image
• Exact coordinates (azimuth and elevation)
• Approximate coordinates
• Just one coordinate, leaving you with a “band” to search
• The “phase” (dynamic range to crank to)
No need to take notes or track down old signals again: you can read (and hear?) past signals at any time from the Signal Log screen, which is also where you choose one as your current target.
The signals also reveal snippets of the sci-fi/horror mystery. No “cut scenes” to wait through—the story comes to you as part of the game play.
I expect most “target items” will be acquirable around 8x or 16x magnification. Zooming in for a closer look than that will most often be optional and “just for fun.”


