So, my Windows laptop is massive, heavy, and hard to carry around. My Chromebook, on the other hand, is light and portable. I really wanted to tinker with Playdate projects on it, but there was one problem: I couldn't get the SDK to work. I did lots of Googling and searched the Playdate dev forum, but there don't seem to be any guides on setting up the SDK on ChromeOS.
So, after plenty of trial and error, I decided to write my own! If you're struggling to get a development environment set up on a Chromebook, hopefully this will be helpful.
First, a couple of caveats:
-
This will not work on ARM-based Chromebooks, as the SDK does not support ARM architecture. (I did my set up on an Intel-based machine.)
-
As of this writing, I can find no way to use a Playdate as a controller for the simulator. My understanding is that ChromeOS simply doesn't allow users to add to or change hardware permissions (in this case USB) via Linux, even when using sudo.
-
On that note, I am not a Linux expert at all. I don't claim that this is the best way to go about things, or that it's even a good way, but it worked for me
 If anyone out there knows a method to improve / replace what I’ve got here, I’m all ears!
Step 1: Enable Linux
This is pretty simple. As long as your Chromebook is relatively new, you should be able to go to your Settings, then Advanced -> Developers -> Linux development environment. All you have to do is click "Turn On." It should ask how much space you want to dedicate to Linux, with a default of 10GB. I believe you can change this later, but I can't imagine needing more than 10GB for Playdate development!
Step 2: Install visual desktop environment
The Playdate simulator seems to expect Linux users to have access to a visual desktop environment. Linux on Chromebooks is meant to be used entirely from the Terminal app, but there is a workaround! Just follow this YouTube video by Ruth Ake for instructions on installing everything you need to run a visual Linux desktop on a Chromebook. If you just want to know the commands, they are listed below. Just open up the Terminal app in ChromeOS and enter them one at a time.
Update Linux
sudo apt-update -y
Upgrade
sudo apt dist-upgrade -y
Install LXDE desktop
sudo apt install task-lxde-desktop -y
Install Nano text editor
sudo apt install nano -y
Install Xephyr, which will create the display window that houses the visual desktop
sudo apt install xserver-xephyr -y
It's worth noting that many of these commands will take several minutes to run and install.
Step 3: Create visual desktop startup script
Using Nano, you will write a short script you can invoke to start up the desktop environment whenever you want. First, fire up Nano to create a script called gol.sh (you can call it whatever you want, really).
nano gol.sh
Once the file is open, enter the following four lines:
#!/bin/bash
Xephyr -br -fullscreen -resizeable :20 &
sleep 5
DISPLAY=:20 startlxde &
Press ctrl+o and Enter to save the file, then ctrl+x to exit the Nano text editor. Now you have your desktop startup script, but you'll need to make it executable. Use the following command to do so:
chmod +x gol.sh
Step 4: Starting up the desktop
To start the desktop environment enter:
./gol.sh
Your fancy new desktop should open up! Note: You may see a “No session…” warning pop up. You can safely ignore this and click OK. You can leave the new desktop environment by letting your mouse hover over the bottom of the screen. This will cause the ChromeOS taskbar to pop up, allowing you to select other apps. If you want to shut down the desktop entirely, right click the Terminal app and select "Shut down Linux."
Now it’s finally time to set up the actual Playdate SDK.
Step 5: Download and extract the Playdate SDK files
Open your browser of choice and head over to the Playdate developer site, accept the terms, and download the SDK files. You can download these wherever you like, but for the sake of this guide, let’s say they are in your default ChromeOS downloads folder. On Linux, the SDK download is served up as a compressed tar.gz.
Right-click the PlaydateSDK-2.0.1.tar.gz file, and you’ll notice a new option under the “Open with…” menu item: Xarchiver. This utility was installed along with the LXDE desktop earlier.

We’re going to use Xarchiver to extract the SDK files to our new desktop environment, so go ahead and click it. Now, click Action -> Extract, or you can click the icon of the little box with an orange arrow.

Xarchiver will ask where you would like to extract the files.
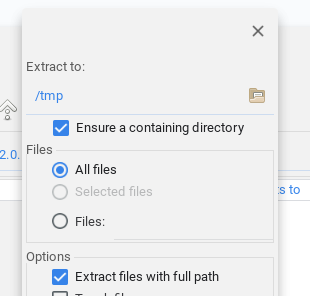
Click on the folder icon to choose a destination directory. Note that installing LXDE earlier added some new folders to our Linux installation, including Desktop, Downloads, and others. I chose home/Desktop as the location for the SDK. Once you’ve picked your destination, click Open, and then Extract.
Step 6: Run the Playdate SDK setup script
Almost there! All we have to do now is open up a Terminal window (you should already have one if you’ve opened the LXDE desktop), navigate to our extracted SDK files, and run setup.sh. In my case, the command is:
cd Desktop/PlaydateSDK-2.0.1/
Your directory may be different, depending on the directory you chose and the version of the SDK you downloaded. From here, we have one last command:
sudo ./setup.sh
You will see the command run, including a lot of “Failed to write’ error messages similar to:
Failed to write 'change' to '/sys/devices/virtual/tty/tty/uevent': Permission denied
Again, I’m not a Linux expert at all, but these errors occur when the setup script is setting the udev rules. At any rate, it doesn’t seem to greatly matter, as the SDK functions anyway! If anyone more well-versed in Linux out there has ideas on getting the udev rules to write, please let me know.
Step 7: Set the Playdate SDK Path variable
To make things simpler, it’s a good idea to set up a Linux environment variable for the path to the Playdate SDK. Assuming you followed the steps so far, and you used the same directories, the command you need to enter is:
export PLAYDATE_SDK_PATH=/home/YOURUSERNAME/Desktop/PlaydateSDK-2.0.1/
Step 8: Compile a game and test it!
In order to confirm everything worked, let’s compile one of the example games included with the SDK. First, navigate to the SDK’s bin folder, which contains the Playdate Compiler (pdc). If you’ve followed the directions thus far and used the same directories, the command you’ll need to enter is:
cd $HOME/Desktop/PlaydateSDK-2.0.1/bin/
Let’s compile the DrumMachine game using this command, again assuming you used all the same directories as this guide in previous steps (note the space between the directory and DrumMachine.pdx file name!):
./pdc $HOME/Desktop/PlaydateSDK-2.0.1/Examples/DrumMachine/Source DrumMachine.pdx
If everything worked, you should get no error messages, and you’ll see a new DrumMachine.pdx file located in the Playdate SDK bin folder. You should be able to start the Playdate simulator by hitting the search button on your Chromebook and typing "Playdate Simulator." Start it up, click File -> Open, and select the .pdx file you just created. If everything went according to plan, it should start up the drum machine game! Again, you can't use the Playdate as a controller, but you can put it in disk mode, load a .pdx onto it and test it directly.
At the most basic level, that’s it! You’re all done installing everything required for Playdate development. You’ll probably want a few other Linux applications to make development more manageable. Personally, I installed:
I also recommend following the instructions on this follow-up video, as it will allow you to run applications inside of the visual desktop (as opposed to the Chromebook taskbar). This makes it easier to navigate everything.
Thanks for reading. Hopefully someone finds this useful!