Playdate Oneil Camera

That's a funny story.

On April 1st @wallmasterr posted a fun video on Twitter about how he made a Game Boy Camera style project on Playdate (using code I shared in this very forum)

I made a Playdate camera app and accessory called the playdate oneil after April Oneil from TMNT's yellow boiler suit and camera. #playdate #camera #tmnt #arduino #teensy #gamedev pic.twitter.com/0r5eUfuzeO

— Alastair Low ➜GDC ➜Midwest Gaming Classic (@Wallmasterr) April 1, 2023

It was a joke of course... but maybe it doesn't have to end here.

In a rather serendipitous way; at about the same time I was making a little prototype also using my old code:

Game Boy Camera, but @playdate.

Who's in? 🟨📷 pic.twitter.com/rNOBjXwPpm

— Tom Granger (@t0m_fr) March 29, 2023

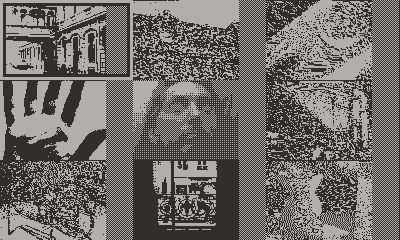
It's working with super cheapo (~€5) OV7670 sensor wired to a Teensy 4.1 via its super fast CMOS Sensor Interface (what interface doesn't it have? these boards are insane). This library does all the framebuffer work. I configured the sensor to YUV instead of RGB and set U and V to zeroes. Then in the code we rearrange the bytes to pack the Y (luma), that we approximate to grayscale, and then dither that to 1-bit using this library. It's set to Atkinson right now but I haven't really tested other options. Then, using Serial USB the resulting image is sent to the Playdate as a series of 12000 bytes with the bitmap command (as documented by @jaames whose JS implementation also helped).

It's capping at about 3 fps currently. In theory this could be much, much faster; and I haven't done any profiling but I'm guessing that serial is the narrowest botteleneck at the moment, but @dave was already going to address that apparently.

(it's QVGA; so 320x240 with black borders to fill up the 400 pixels of the Playdate. To go full screen I believe I'd need to add some PSRAM chips to the Teensy to let it process full VGA, and then scale/crop to fit the full 400x240).

So, should we try to get from there to Playdate Oneil ?

  • Yes the world needs it
  • Maybe try to make an actual game instead for once
0 voters

It's quite close, but there is a roadblock.

I can send a feed for "viewfinder mode" but I can't stop it to get back to the app and record a picture (which could happen either on the Teensy's SD card or in the Playdate's memory).

The Teensy sends bitmap commands constantly and it's pretty difficult to interrupt the bitmap stream from a Playdate button (eg to snap a picture). A button press does return to the app but the press isn't registered in it. I have an embryo of a hacky solution (immediately take action in the game loop when it resumes to tell the Teensy to stop sending bitmaps) but that's a bit hit and miss, and any button press will have the same effect.

Another option would be to wire a separate button to the Teensy but it's definitely not as cool.

A third way maybe would be to try eval instead of bitmap. I don't know how this behaves and if it interrupts the running app as bitmap does.

Anyway, here's the gist. Might be fun to explore further. And once the camera works, we could hook up a thermal printer, or try recording video... :slight_smile:

To be continued ?

9 Likes

I sort of alluded to this on Twitter already, but eval can definitely be useful here, and will get around the roadblock of the bitmap serial command not being able to interact with the currently running game.

eval is used to pass a compiled Lua script to be executed on the Playdate, and this script happens to get access to the global Lua scope of whatever app is currently running (with the exception of system apps like Catalog, which I guess are blocked for security). The app itself will stay running. You can probably see where this is going :^)

It's a little funky, but my trick has been to pre-compile a Lua script that simply calls a function in the global scope of my game with a long string as an argument. I find out where that string ends up in the compiled Lua bytecode and dynamically replace it with whatever data I want to send into the game before I pass the bytecode into eval. As long as that data isn't any longer than the string you're replacing, it's pretty quick and easy. You can pack whatever data you want into that string on the sending side, and then decode it on the Playdate side either by using Lua's string.unpack or by passing it into C - I think the latter would be much faster here if the goal is to turn the data into an image!

Happy to collab on this if you're interested (:

1 Like

Thanks! Definitely sounds like the way to go. And with your pd-usb we could make a browser+webcam version that works with the same playdate app and requires no extra hardware :slight_smile:

Happy to collab !

1 Like

The image below is cool because unlike previous ones that came from the Teensy, this one is a proper Playdate screenshot, which proves that the eval route works and allows us to stay in the context of the game, meaning that all some of the wildest dreams of the 7 voters above are achievable.

Camera 2023-04-04 23.48.47

It was a bit finicky to get there, and it takes something like 5 seconds to render a single frame because of the naive Lua implementation I wrote; but there's plenty of room for improvement (like switching to C for starters). To be continued I guess...

PS: woops looks like I got the centering wrong somewhere ¯\(ツ)

2 Likes

The app is now processing the eval data in C, at a pretty decent framerate :slight_smile:

This means we're getting closer to a usable camera app, and can now control stuff like the dithering algorithm applied by the Teensy, or the sensor's brightness/contrast on the fly.

Below a few tests with different dithering algorithms (I'll let the experts guess what they are)

Camera 2023-04-07 01.01.40

Camera 2023-04-07 01.01.58

Camera 2023-04-07 01.02.14

I posted some updates on twitter/mastodon but I figured I could give a heads up in this thread too.

I updated the prototype to make it more compact and portable, and I made some improvements to the playdate app.

It runs at about 3 fps (the image feed, not the entire app) and I still haven't taken the time to look at why it's not faster. I suspect it's the serial though. Anyway it's quite useable as is, arrow buttons cycle through 7 different dithering modes, A button saves a picture as .gif into the apps's Data folder. No need to use system level screenshots anymore! Makes it much faster and more convenient to take pictures!

I've started adding some status information on the screen. Maybe it'll become a DSLR style overlay, for now it's on the side.

Here are some examples I took today.

20230412_232600
20230412_232556
20230412_232554
20230412_232559

Next up, maybe add brightness or contrast control, maybe build a camera roll gallery thing although the SDK's scale method destroys dithered images so it'll probably need to be a full screen roll...

I also just had an idea of using the crank to record short animated gifs, like an old school camera. Maybe saving the data as an image quilt and then having an external tool to convert that back into gif/video ?

5 Likes

Menu!

Left right to circle through settings, up down to change values within a setting. For now, settings are filter/dithering type, brightness, contrast, threshold level. The menu is essentially a single row gridview that contains a single column gridview in each cell. The main gridview's drawCell function draws the menu header and the nested vertical gridview underneath. I have no idea if this is reasonable, but it works and it is very flexible so I can test stuff quickly.

screenshot

When the camera feed is enabled FPS drops to 16-18 and I'm not sure why (that's low, but still 4-6 times higher than the actual picture refresh rate...). Camera image is using a sprite; I just setImage on it when a new picture has been processed.

Lenses!

I'm working on a PCB design to make this (hopefully) easy to replicate, and I've also ordered a few cheap CS lenses to try out. It's bulkier (although most are smaller than the zoom lens pictured below) but (as expected) also much better quality than the plastic lens that comes with these OV7670 boards.

Here are a couple of macros. Will do more field testing tomorrow !
2023-04-22_17-33-32

2023-04-22_17-40-40

Cheers

9 Likes

Just posting to encourage you to keep making progress and sharing it here because this is insane and I love it!

3 Likes

Thanks for the encouragements Scott :slight_smile:

I'm currently working on the case and PCB. I received a first PCB prototype which I obviously completely messed up, and I'm now going through several iterations of a case design. I think I'm closing in. It should come with a handful of neat little features (magnets to hold the playdate, selfie mode, etc) all while being relatively easy to build, but I need to do some more designing and 3d printing to refine the design and then I'll order a new bespoke PCB...


6 Likes

Progress!

New PCB!

This time it's purple!

Also it works!

Time to finish the case!

I hate FreeCAD!

7 Likes

It looks so amazing!

Here are some purple PCBs from the Playdate archive. I'm pretty sure Playdate wouldn't have happened without OSHPark. :smiley:

13 Likes

Ok so here's an exclusive look at the almost finished case :wink:

I started it in FreeCAD but I grew tired (polite understatement) of its quirks so I rebuilt the whole project from scratch on Onshape and carried on from there. Best decision I ever made too late.

It prints in 4 parts without support, assembles without tools using press fit and snap locks. This test print took about 4 hours on a Prusa MK3s with PETG. The design in 4 parts leverages the textured bed sheet for a nice surface finish on all back and front facing surfaces.

The case is 1.5 Playdate tall - with the extra height at the bottom when held normally - and there's a chin kind of thing that makes the front face flush with the console. This serves several purposes but combined with the added thickness, makes it quite comfortable to hold (even for just playing!).

The chin part hides the USB cable and you can take the PD out and snap it on the other side of the case for some 1-bit selfie action without disconnecting the cable in the process. The camera bump is 0.5 Playdate tall like the front chin, and is not full width so it keeps the PD's power button accessible in this configuration too.

The PD is locked with magnets in both modes (but obviously better secured in regular mode).

The case holds a giant 5000mAh battery that charges the PD in addition to powering the camera hardware. I don't know how long it's going to run, but long. There's a power switch at the top of the case and a charging port at the bottom.

Right now it's possible to easily swap out the sensor board without opening the case so I can test different lens mounts (swapping the entire board). I don't know if that's useful beyond prototyping and I might change it in the final design.

There's one last cool little feature I'm not mentioning here, I'll save it for the next update :wink:

I'm quite happy with this last test and I'd say I'm ~90% done with the design by now. I have some small adjustments to make here and there but this is very close to the end goal.

I'll show off the inside in a later post; it might not look like much but it's the most complex 3d thing I've ever designed and it was a lot of fun-pain. I hope you like it!

Now the big question is, what color should I print the final make? :wink:

13 Likes

That's amazing!

I kind of think a black print works well: automatically matches (part of) the Playdate, as well as the lens.

Purple would be cool too though! Or anything but a slightly-wrong yellow.

1 Like

Agreed! I think I'll simply go with jet black instead of this glittery "galaxy black".

2 Likes

By the way, as I discovered making this "photo roll" project (free to adapt), scaling dithered images to 1/3 does a pretty decent job of preserving a wide variety of dithered tones. Works great for ordered dithers especially, but more random scatterings don't come out half bad either.

(And I like your dawn-of-cinema cranked video idea!)

1 Like

Mark 3 is now fully designed, assembled and operational yay :slight_smile:

pd cam selfie mode small

So I got back to the software side, added mirror mode for more comfortable selfies:

Next will be the finishing touches: a start screen, a camera roll. And I think there's a nasty memory leak somewhere because the PD always ends up crashing if left streaming from the camera for a couple of minutes straignt. Problem is, it's very hard to debug. Maybe I'll just put a timeout on the viewfinder and call it fixed.

I'll make a little video to demo the whole thing end to end in the coming days. And then I'll document the build process, tidy up the code, and put everything on github. I might try another revision of the case/hardware before I do as I'd like to make it a bit more generic (right now it's designed to fit exactly the battery pack and power circuit I used).

Oh and here's the one more thing I teased in the previous post: the reason why the PCB is purple (and oversized) is because we can see it through holes in the case that act as pockets to store the console and protect its screen during transport :slight_smile:

pd cam cover mode small

Cheers!

10 Likes

This is excellent. Forget the camera, it looks fun just to change the configurations around like a transformer!

3 Likes

Here's a little video I made :slight_smile:

3 Likes

I actually did find and test your viewer earlier and this is how I knew the images didn't scale too well with error diffusion based dithering :

playdate-20230610-223548

However I returned to it tonight and I've found a simple fix :slight_smile:
Applying a small blur before scaling down makes a huge difference !

img:blurredImage(1, 1, gfx.image.kDitherTypeScreen, true)

playdate-20230610-223633

I'll be factoring your code inside of the camera app next ! I guess instead of saving the pictures only as gif for easy export, I'll need to save 2 copies, one gif for export and one pdi that I can read back to render this viewer. No biggie.

4 Likes