Struggling with Pseudo3D racing game engine

Hello everyone! Sorry for the long post, but I want to explain my background and what I did so far :smile:

TL:DR I would love to get help with understanding what arguments should I give to image:drawSampled()

While waiting for my Group 5 device to be sent I started my game dev learning journey. I'm starting almost from scratch – my last contact with programming was 3 semesters of Java on IT studies, over 10 years ago. I work as UX Designer, so I don't have many opportunities to see the code or use heavy math :wink: Coding games is a pretty new experience for me. I write in Lua, and i use MacOS.

Before I will start to build my dream game, my plan is to go through different demos, to learn how stuff is done. All of them feature my cat and his friend. I'm going through classic game formulas, which were popular in 80/90s. I thought that Hironobu Sakaguchi did shooters and racing games before he started Final Fantasy. :smile:

So far I have done Pong clone and a side shooter. Now I'm struggling with a pseudo-3d racing game. I was following this tutorial for Pico8 and had some results. I had to do the trick by drawing these lines on an image with gfx.lockFocus() because without that they were going over the car.

Koko&KebiRacing

Unfortunately, I experienced a problem that I can't overcome. For having a road build of segments, it is recommended to draw trapeziums with horizontal lines. Unfortunately, code from the tutorial for Pico, gives strange results on PlayDate when the road curves.

kebi-racing

I'm also not sure how drawing so many lines would behave on an actual device. At first, I lost my motivation, but then I got an idea for clever usage of image:drawSampled(). So here is my idea:

I prepared graphics with different road segments presented from the top perspective. Then I used gfx.pushContext() on my "road" sprite, to build a top view of the road. For the experiment, I made two differently dithered graphics, and put them together with pure black rectangles. Here is the result:

road-pattern

Building a road on the fly with pre-made chunks gives a lot of options, as I can easily add many details without struggling with coding primitives. I could swap them, to simulate speed. So it wouldn't be a true Mode7 game, but rather still a fake F1 race.

My problem is: that I totally cannot understand usage arguments for drawSampled() , especially "centerx, centery" "dxx, dyx, dxy, dyy, dx, dy". Could anyone give me an example of which arguments should I put to get an effect like below? The image is 400x200 and I assume horizon would be on ~half of the screen.
road-pattern-distorted

I start with road:drawSampled(0, 140, 400, 240 but I don't know how to figure out the rest. I tried to reverse-engineer the mode7 demo from PlayDate SDK but unfortunately its too complicated for me :smiling_face_with_tear:

I don’t know anything about the mode 7 stuff, but regarding the trapezoid method:

How are you drawing the filled version? It kinda looks like whatever you’re doing is only drawing convex shapes for whatever reason. If you’re worried about performance with the tutorial’s line-by-line shape filling method, graphics.fillPolygon (either called once per trapezoid, or once with all the line segment endpoints for the entire road shape) should perform well, I would think.

Thank you for the response! :pray:t2: As I was struggling with mode7 today, I decided to give one more try with trapezoid method. And actually just I found about using polygons as trapezium myself. Unfortunately they still behave super weird when road turns. Also I wrote code for verticle "dash" marks in the middle of the road, and discover they behave odd too. It should draw a small trapezoid after each 4 segments, but it makes a long blinking line instead.
messy-racer

Here is my messy code :hear_no_evil:

import "CoreLibs/sprites"
import "CoreLibs/graphics"

local pd <const> = playdate
local gfx <const> = pd.graphics

--[[The road is made out of "corners" (for our purposes we will call straight bits "corners" as well). 
    Corners need to curve in the direction the road turns, so we will simulate this by building them out of smaller straight "segments".
    We can define the track as an array of these corners. Each corner has a segment count "ct" and a value indicating how much the direction turns between each segment "tu".
    So tu=0 creates a straight piece, tu=1 will turn to the right, -1 left etc. For simplicity we'll ignore hills and valleys for now.--]]

backgroundImage = gfx.image.new(400,240,gfx.kColorBlack)

gfx.sprite.setBackgroundDrawingCallback(
    function( x, y, width, height )
        -- x,y,width,height is the updated area in sprite-local coordinates
        -- The clip rect is already set to this area, so we don't need to set it ourselves
        backgroundImage:draw( 0, 0 )
    end
)

road={
    {ct=50,tu=0},
    {ct=30,tu=-0.1},
    {ct=15,tu=0},
    {ct=4,tu=1.5},
    {ct=10,tu=0.2},
    {ct=4,tu=0},
    {ct=5,tu=-1},
}     


-- calculate the # of segments
-- in the road before each corner.
-- this is useful for spacing things
-- out evenly along the road

local sumct=0
local i = 1
while i <= #road do
local corner = road[i]
corner.sumct = sumct
sumct = sumct + corner.ct
i = i + 1
end

function getsumct(cnr,seg)
    return road[cnr].sumct+seg-1
end

-- camera
   camcnr,camseg=1,1
   camx,camy,camz=0,0,0

-- function to turning 2D into psuedo 3D
function project(x,y,z)
    local scale=200/z
    return x*scale+200,y*scale+120,scale
end

-- advance along road, goes trhough segments of each corners and jump to another corner after last segment

function advance(cnr,seg)
    seg += 1
    if (seg > road[cnr].ct) then
        seg = 1
        cnr += 1
        if (cnr > #road) then
            cnr = 1
        end
    end
    return cnr, seg
end

function skew(x,y,z,xd,yd)
    return x+z*xd,y+z*yd,z
end

function roadUpdate()
    camz+=0.3 -- speed of the car
    if camz>1 then
     camz-=1
     camcnr,camseg=advance(camcnr,camseg)
    end
end

-- car and cat drivers
local image = gfx.image.new('images/car')
local sprite = gfx.sprite.new(image)
sprite:setZIndex(32767)
sprite:setScale(1.2)
sprite:moveTo(200, 200)
sprite:add()

function playdate.update()
    gfx.clear()
    backgroundImage:clear(gfx.kColorBlack) -- clears road, to make space for another road riding animation frame
    -- direction
    local camang=camz*road[camcnr].tu
    local xd,yd,zd=-camang,0,1

    -- skew camera to account for direction 
    local cx,cy,cz=skew(camx,camy,camz,xd,yd)

    -- cursor, relative to skewed camera
    local x,y,z=-cx,-cy+2,-cz+2
    
    -- road position
    local cnr,seg=camcnr,camseg

     -- previous projected position
     local ppx,ppy,pscale=project(x,y,z)

    -- draw forward
    for i=1, 30 do
    -- project (turns x, y, z into 3D using a scale)
    local px,py,scale=project(x,y,z)
    
    -- draw road
    --local width=3*scale
    local width1,width2=4*scale,4*pscale
    
    gfx.lockFocus(backgroundImage)
    
    gfx.setPattern({ 0xaa, 0x55, 0xaa, 0x55, 0xaa, 0x55, 0xaa, 0x55 })
    --gfx.setColor(gfx.kColorWhite)
    gfx.fillPolygon(px-width1,py,px+width1,py,ppx+width2,ppy,ppx-width2,ppy)

    --gfx.setColor(gfx.kColorBlack)
    --gfx.drawLine(px-w1,py,px+w1,py)

    local sumct=getsumct(cnr,seg)
    print(sumct)

    if (sumct%4)==0 then
        local mwidth1,mwidth2=0.1*scale,0.1*pscale
            gfx.setColor(gfx.kColorBlack)
            gfx.fillPolygon(px-mwidth1,py,px+mwidth1,py,ppx+mwidth2,ppy,ppx-mwidth2,ppy)
    end

    gfx.unlockFocus()
    
    -- move forward
    x+=xd
    y+=yd
    z+=zd
    
    -- turn, cnr means corners which are elements from road table
    xd+=road[cnr].tu
    
    -- advance along road, goes trhough segments of each corners and jump to another corner after last segment
    cnr, seg = advance(cnr,seg)

    end 
    roadUpdate()
    gfx.sprite.update()
    pd.drawFPS(0,0)
    
end

You’re updating px, py, width1 etc each iteration of the loop, but you’re only setting ppx, ppy etc once, before the loop starts. That means that every trapezoid you fill goes all the way back to the first line instead of just to the previous one.

All I had to do to fix it was add the line ppx,ppy,pscale = px, py, scale within the loop after the drawing finishes (e.g. on line 142 after gfx.unlockFocus) to keep those variables up to date so the next iteration can reference them.

I don’t have the images but the track drawing stuff runs great on device with around 40% cpu usage at 30fps. I was able to get it down to around 25% cpu by moving all the road drawing code directly into the background drawing callback (avoiding having to store it in an image) and taking out the print statement (which was using around 5%, I guess because it prints over serial).

Here’s my optimized version
import "CoreLibs/sprites"
import "CoreLibs/graphics"

local pd <const> = playdate
local gfx <const> = pd.graphics

--[[The road is made out of "corners" (for our purposes we will call straight bits "corners" as well). 
	Corners need to curve in the direction the road turns, so we will simulate this by building them out of smaller straight “segments”.
	We can define the track as an array of these corners. Each corner has a segment count "ct" and a value indicating how much the direction turns between each segment “tu”.
	So tu=0 creates a straight piece, tu=1 will turn to the right, -1 left etc. For simplicity we'll ignore hills and valleys for now.--]]


gfx.sprite.setAlwaysRedraw(true) -- ensures the entire background gets drawn in one go every frame, important if the background drawing callback does anything complex
gfx.setBackgroundColor(gfx.kColorBlack)
gfx.sprite.setBackgroundDrawingCallback(
	function( x, y, width, height )
		drawRoad()
	end
)

road={
	{ct=50,tu=0},
	{ct=30,tu=-0.1},
	{ct=15,tu=0},
	{ct=4,tu=1.5},
	{ct=10,tu=0.2},
	{ct=4,tu=0},
	{ct=5,tu=-1},
}     


-- calculate the # of segments
-- in the road before each corner.
-- this is useful for spacing things
-- out evenly along the road

local sumct=0
local i = 1
while i <= #road do
local corner = road[i]
corner.sumct = sumct
sumct = sumct + corner.ct
i = i + 1
end

function getsumct(cnr,seg)
	return road[cnr].sumct+seg-1
end

-- camera
   camcnr,camseg=1,1
   camx,camy,camz=0,0,0

-- function to turning 2D into psuedo 3D
function project(x,y,z)
	local scale=200/z
	return x*scale+200,y*scale+120,scale
end

-- advance along road, goes trhough segments of each corners and jump to another corner after last segment

function advance(cnr,seg)
	seg += 1
	if (seg > road[cnr].ct) then
		seg = 1
		cnr += 1
		if (cnr > #road) then
			cnr = 1
		end
	end
	return cnr, seg
end

function skew(x,y,z,xd,yd)
	return x+z*xd,y+z*yd,z
end

function drawRoad()
	-- direction
	local camang=camz*road[camcnr].tu
	local xd,yd,zd=-camang,0,1
	
	-- skew camera to account for direction 
	local cx,cy,cz=skew(camx,camy,camz,xd,yd)
	
	-- cursor, relative to skewed camera
	local x,y,z=-cx,-cy+2,-cz+2
	
	-- road position
	local cnr,seg=camcnr,camseg
	
	 -- previous projected position
	 local ppx,ppy,pscale=project(x,y,z)
	
	-- draw forward
	for i=1, 30 do
		-- project (turns x, y, z into 3D using a scale)
		local px,py,scale=project(x,y,z)
		
		-- draw road
		--local width=3*scale
		local width1,width2=4*scale,4*pscale
		
		gfx.setPattern({ 0xaa, 0x55, 0xaa, 0x55, 0xaa, 0x55, 0xaa, 0x55 })
		--gfx.setColor(gfx.kColorWhite)
		gfx.fillPolygon(px-width1,py,px+width1,py,ppx+width2,ppy,ppx-width2,ppy)
		
		--gfx.setColor(gfx.kColorBlack)
		--gfx.drawLine(px-w1,py,px+w1,py)
		
		local sumct=getsumct(cnr,seg)
		-- print(sumct)
		
		if (sumct%4)==0 then
			local mwidth1,mwidth2=0.1*scale,0.1*pscale
				gfx.setColor(gfx.kColorBlack)
				gfx.fillPolygon(px-mwidth1,py,px+mwidth1,py,ppx+mwidth2,ppy,ppx-mwidth2,ppy)
		end
		
		ppx,ppy,pscale = px, py, scale
		-- move forward
		x+=xd
		y+=yd
		z+=zd
		
		-- turn, cnr means corners which are elements from road table
		xd+=road[cnr].tu
		
		-- advance along road, goes trhough segments of each corners and jump to another corner after last segment
		cnr, seg = advance(cnr,seg)
	
	end 
end

function roadUpdate()
	camz+=0.3 -- speed of the car
	if camz>1 then
	 camz-=1
	 camcnr,camseg=advance(camcnr,camseg)
	end
end

-- car and cat drivers
local image = gfx.image.new('images/car')
local sprite = gfx.sprite.new(image)
sprite:setZIndex(32767)
sprite:setScale(1.2)
sprite:moveTo(200, 200)
sprite:add()

function playdate.update()
	roadUpdate()
	gfx.sprite.update()
	pd.drawFPS(0,0)
end
1 Like

Thats great! Thank you very much :smiling_face_with_three_hearts: I didn't know that I could call the road drawing function directly into the background, and even that it saves CPU usage. I need to learn about programming a lot more :dizzy_face:

After adding that missing line of code, the road and marks in the center generate as they should, and its
Koko & Kebi Racing Working

Now I need to convert more stuff from the tutorial, like horizontal stripes on the grass outside of the road which in Pico is done with this ` if(flr(y2)<ceil(y1))return

-- draw ground
local gndcol=3
if((sumct%6)>=3)gndcol=11
rectfill(0,ceil(y1),128,flr(y2),gndcol)`

Earlier that part went blinking and messy too, but I hope this time it will work as it should. Of course, instead of calling a function with color, I will have to do IF/Else with gfx.setColor() before.

I will be back if I hit a wall once again :smile: Your help gave me more motivation, especially considering the fact, that there are not many pseudo-3D racers on PlayDate so far.

2 Likes

So far, so good! Although I built the main road from polygon-made trapezoids, I had to use the line-built-trapezium method for these smaller checkboard borders of the road. The math for them was too hard for me to convert into the polygonal method. At last, the result is quite nice. Once again thank you so much for help. You saved my project!

Koki & Kebi Racing with grass

Now I'm going to follow Tutorial 2 and Tutorial 3, for the sprites on the side of the road and special effects like having hills on the road or tunnels. Unfortunately, there is no tutorial for other cars and enemy drivers on the road, so for sure, I will stuck when I reach that part.

3 Likes

I'm so sorry for bothering you again, but I'm afraid that I need your advice more :sweat_smile:

I was following the tutorial, to add properly scaled sprites of trees on the side of the road. It's done by prepopulating an ArrayList of coordinates and then drawing sprites going through the list backward, to ensure that the closest ones are drawn on the top. I know I could done that also without ArrayList by manipulating Z index via "sprite:setZIndex()" but I wanted to go with the tutorial. And... it works! I debugged this with "pd.stop()"

KartStatic

And starts being messy after the first frame of the animation :cry:

messyracer

I understand that I should call the function "sprite:remove()" on the trees somewhere in the code but so far I haven't been able to figure out where. I tried for example to do that at the beginning of each "drawScreen()" but it didn't work. Also, I thought that "sprite.setAlwaysRedraw(true)" marks everything as dirty and clears sprites at the beginning of every frame, but why it isn't working with trees?

Here is the current code


import "CoreLibs/sprites"
import "CoreLibs/graphics"

local pd <const> = playdate
local gfx <const> = pd.graphics

--[[The road is made out of "corners" (for our purposes we will call straight bits "corners" as well). 
	Corners need to curve in the direction the road turns, so we will simulate this by building them out of smaller straight “segments”.
	We can define the track as an array of these corners. Each corner has a segment count "ct" and a value indicating how much the direction turns between each segment “tu”.
	So tu=0 creates a straight piece, tu=1 will turn to the right, -1 left etc. For simplicity we'll ignore hills and valleys for now.--]]


gfx.sprite.setAlwaysRedraw(true) -- ensures the entire background gets drawn in one go every frame, important if the background drawing callback does anything complex
gfx.setBackgroundColor(gfx.kColorBlack)
gfx.sprite.setBackgroundDrawingCallback(
	function( x, y, width, height )
        drawScreen()
	end
)

road={
	{ct=50,tu=0},
	{ct=30,tu=-0.1},
	{ct=30,tu=0},
	{ct=30,tu=0.2},
	{ct=10,tu=0.2},
	{ct=4,tu=0},
	{ct=5,tu=-1},
}     


function calculateRoad()

    -- calculate the # of segments
    -- in the road before each corner.
    -- this is useful for spacing things
    -- out evenly along the road

    local sumct=0
    local i = 1
    while i <= #road do
    local corner = road[i]
    corner.sumct = sumct
    sumct = sumct + corner.ct
    i = i + 1
    end

end

function getsumct(cnr,seg)
	return road[cnr].sumct+seg-1
end

-- camera
   camcnr,camseg=1,1
   camx,camy,camz=0,0,0

-- function to turning 2D into psuedo 3D
function project(x,y,z)
	local scale=200/z
	return x*scale+200,y*scale+120,scale
end

-- advance along road, goes trhough segments of each corners and jump to another corner after last segment

function advance(cnr,seg)
	seg += 1
	if (seg > road[cnr].ct) then
		seg = 1
		cnr += 1
		if (cnr > #road) then
			cnr = 1
		end
	end
	return cnr, seg
end

function skew(x,y,z,xd,yd)
	return x+z*xd,y+z*yd,z
end

function drawScreen()

	-- direction
	local camang=camz*road[camcnr].tu
	local xd,yd,zd=-camang,0,1
	
	-- skew camera to account for direction 
	local cx,cy,cz=skew(camx,camy,camz,xd,yd)
	
	-- cursor, relative to skewed camera
	local x,y,z=-cx,-cy+2,-cz+2
	
	-- road position
	local cnr,seg=camcnr,camseg
	
	 -- previous projected position
	 local ppx,ppy,pscale=project(x,y,z)


     -- array of sprites to draw
    local spritesToDraw={} 
	
	-- draw forward
    for i=1, 30 do
		-- project (turns x, y, z into 3D using a scale)
		local px,py,scale=project(x,y,z)
		
        -- draw road
        local sumct=getsumct(cnr,seg)
        drawroad(px,py,scale,ppx,ppy,pscale,sumct)


        -- add background sprites to draw
        if (sumct%6)==0 then
        -- left tree
        local tx,ty=px-4.5*scale,py
        local tw,th=1.5*scale,3*scale
        local tscale=0.06*scale
        table.insert(spritesToDraw,{x=tx,y=ty,w=tw,h=th,s=tscale})
        
        -- right tree
        tx=px+6.5*scale
        table.insert(spritesToDraw,{x=tx,y=ty,w=tw,h=th,s=tscale})
       end

        
		-- move forward
		x+=xd
		y+=yd
		z+=zd
		
		-- turn, cnr means corners which are elements from road table
		xd+=road[cnr].tu
		
		-- advance along road, goes trhough segments of each corners and jump to another corner after last segment
		cnr, seg = advance(cnr,seg)

        -- track previous projected position
		ppx,ppy,pscale = px, py, scale

	end 

    -- draw background sprites in reverse order
    for i=#spritesToDraw,1,-1 do
    drawbgsprite(spritesToDraw[i])
    end
    treeSprite:remove() 
end


function drawbgsprite(s)
    local treeImage = gfx.image.new('images/sakura_tree')
    treeSprite = gfx.sprite.new(treeImage)
    treeSprite:setScale(s.s)
    treeSprite:moveTo(s.x-s.w/2,s.y-s.h)
    treeSprite:add()
end


function drawroad(x1,y1,scale1,x2,y2,scale2,sumct)

    if(math.floor(y2)<math.ceil(y1))then return end
   
    -- draw ground
    gfx.setColor(gfx.kColorBlack)
    gfx.setPattern({ 0x0f, 0xf0, 0x0f, 0xf0, 0x0f, 0xf0, 0x0f, 0xf0 }) 
    if((sumct%6)>=3) then 
        gfx.setColor(gfx.kColorWhite) 
        --gfx.setPattern({ 0xaa, 0x55, 0xaa, 0x55, 0xaa, 0x55, 0xaa, 0x55 })  
    end
    gfx.fillRect(0,math.ceil(y1),400, (y1-y2))
    
    -- main road
       local w1,w2=3*scale1,3*scale2            -- start and end widths
       gfx.setColor(gfx.kColorBlack)
       gfx.setPattern({ 0xaa, 0x55, 0xaa, 0x55, 0xaa, 0x55, 0xaa, 0x55 })
       --drawTrapezium(x1,y1,w1,x2,y2,w2)
       gfx.fillPolygon(x1-w1, y1, x1+w1, y1, x2+w2, y2, x2-w2, y2)
       
    -- center line markings
    gfx.setColor(gfx.kColorBlack)
    if (sumct%4)==0 then
        local mw1, mw2 = .1*scale1, .1*scale2
        gfx.fillPolygon(x1-mw1, y1, x1+mw1, y1, x2+mw2, y2, x2-mw2, y2)
        end
    
    -- shoulders
    gfx.setColor(gfx.kColorWhite)
    if((sumct%2)==0) then gfx.setColor(gfx.kColorBlack) end
    local sw1,sw2= 0.2*scale1, 0.2*scale2

    drawTrapezium(x1-w1,y1,sw1,x2-w2,y2,sw2)
    --gfx.fillPolygon(x1-w1, y1, x1+sw1, y1, x2+sw2, y2, x2-sw2, y2)
    drawTrapezium(x1+w1,y1,sw1,x2+w2,y2,sw2) 
    --gfx.fillPolygon(x1-sw1, y1, x1+sw1, y1, x2+sw2, y2, x2-sw2, y2)]]--
   
end

function drawTrapezium(x1,y1,w1,x2,y2,w2)
    -- draw a trapezium by stacking horizontal lines
       local h=y2-y1                                                                         -- height
       local xd,wd=(x2-x1)/h,(w2-w1)/h -- width and x deltas
       local x,y,w=x1,y1,w1  -- current position
    local yadj=math.ceil(y)-y
    x+=yadj*xd
    y+=yadj
    w+=yadj*wd 
    while y<y2 do
     -- draw horizontal line
     gfx.drawLine(x-w,y,x+w,y)
           x+=xd
           y+=1
           w+=wd
       end
   end

function roadUpdate()
	camz+=0.3 -- speed of the car
	if camz>1 then
	 camz-=1
	 camcnr,camseg=advance(camcnr,camseg)
	end
end


-- car and cat drivers
local image = gfx.image.new('images/car')
local sprite = gfx.sprite.new(image)
sprite:setZIndex(32767)
sprite:setScale(1.2)
sprite:moveTo(200, 200)
sprite:add()

function pd.update()
	calculateRoad()
    roadUpdate()
	gfx.sprite.update()
	pd.drawFPS(0,0)
    --pd.stop()
end

False alarm. A miracle happened and I've figured it out by myself! Although It cost me a lot of time and hair pulled from my head :joy:

So I created an array for drawn sprites, and at the end of my drawing sprites function I added a "table.insert" which inserts all drawn sprites to this aray.

function drawbgsprite(s)
    
    local treeImage = gfx.image.new('images/sakura_tree')
    local treeSprite = gfx.sprite.new(treeImage)
    treeSprite:setScale(s.s)
    treeSprite:moveTo(s.x-s.w/2,s.y-s.h)
    treeSprite:add()
    table.insert(drawnSprites, treeSprite)
end

Then I added "playdate.graphics.sprite.removeSprites(spriteArray)" on the beginning on my drawScreen() function, so it starts like this:

function drawScreen()

    -- cleaning screen from sprites added in previous animation frame

    gfx.sprite.removeSprites(drawnSprites)

And voila, this is the result:
Koko & Kebi Racer With Trees

Koko and Kebi now can drive in between nice sakura trees.

So next step will be adding different types of sprites, like houses, bridges above roads, etc., or tori gates maybe :sweat_smile:. Then I will go with the tutorial on making hills and tunnels.

The biggest challenge will be figuring myself how to implement NPC drivers, make the game actually playable, and add to all of these sprites collision systems.

5 Likes

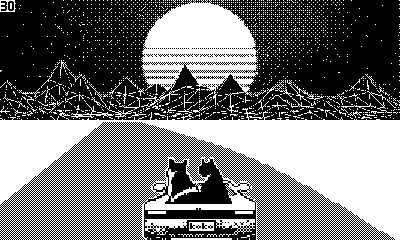
After a whole day of thinking I figured out how to add a moving NPC driver, which was quite an achievement for me, as I'm a programming noob. And I haven't found a tutorial for NPC cars in pseudo-3D racing so I had to improvise.

Unfortunately, the result is relatively choppy, especially when I move the player car near NPC car.

Koko & Kebi Racing with NPC

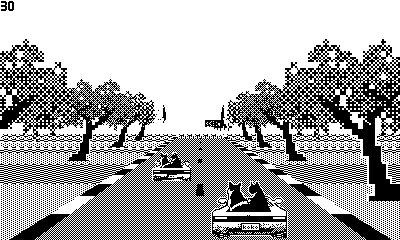
Could anyone look at my code and give me a hint of how I could make the trip smoother for these poor cats? :face_holding_back_tears: @daprice maybe you got an idea?

import "CoreLibs/sprites"
import "CoreLibs/graphics"

local pd <const> = playdate
local gfx <const> = pd.graphics

--[[The road is made out of "corners" (for our purposes we will call straight bits "corners" as well). 
	Corners need to curve in the direction the road turns, so we will simulate this by building them out of smaller straight “segments”.
	We can define the track as an array of these corners. Each corner has a segment count "ct" and a value indicating how much the direction turns between each segment “tu”.
	So tu=0 creates a straight piece, tu=1 will turn to the right, -1 left etc. For simplicity we'll ignore hills and valleys for now.--]]


gfx.sprite.setAlwaysRedraw(true) -- ensures the entire background gets drawn in one go every frame, important if the background drawing callback does anything complex
gfx.setBackgroundColor(gfx.kColorWhite)
gfx.sprite.setBackgroundDrawingCallback(
	function( x, y, width, height )
        drawScreen()
	end
)


local bg_tree = {
    img = "images/sakura_tree",
    pos={3,0},     -- position relative to side of road
    siz={1.5,2},     -- size
    spc=6,            -- spacing
    bgscl=0.06,        -- param to scale sprite
    flpr=true
}

local bg_turn_sign = {
    img = "images/turn_sign",
    pos={1,0.3},
    siz={1.5,1.5},
    spc=2,
    bgscl=0.03,
    flpr=true        -- flip when on right hand side

}

local npcSprite = {
    img = "images/car",
    siz={1.0,1.0},
    bgscl=0.011,
    roadPosition=1,
    maxRoadSegments=0, -- moment when road position of the NPC should be reset to 1. A value is added in calculateRoad() function
    speed=0.01,
}


local road={
    {ct=20,tu=0,bgl=bg_tree,bgr=bg_tree},
    {ct=20,tu=-.25,bgl=bg_tree,bgr=bg_turn_sign},
    {ct=20,tu=0,bgl=bg_tree,bgr=bg_tree},
}   


local drawnSprites = {}

local playerCarSpeed = 0


function npcDrive()
    if (npcSprite.roadPosition > npcSprite.maxRoadSegments) then npcSprite.roadPosition = 1
    else npcSprite.roadPosition +=0.45
    end
end

function calculateRoad()

    -- calculate the # of segments
    -- in the road before each corner.
    -- this is useful for spacing things
    -- out evenly along the road

    local sumct=0
    local i = 1
    while i <= #road do
    local corner = road[i]
    corner.sumct = sumct
    sumct = sumct + corner.ct
    i = i + 1
    end
    npcSprite.maxRoadSegments=sumct
end

function getsumct(cnr,seg)
	return road[cnr].sumct+seg-1
end

-- camera
   camcnr,camseg=1,1
   camx,camy,camz=0,0,0

-- function to turning 2D into psuedo 3D
function project(x,y,z)
	local scale=200/z
	return x*scale+200,y*scale+120,scale
end

-- advance along road, goes trhough segments of each corners and jump to another corner after last segment

function advance(cnr,seg)
	seg += 1
	if (seg > road[cnr].ct) then
		seg = 1
		cnr += 1
		if (cnr > #road) then
			cnr = 1
		end
	end
	return cnr, seg
end

function skew(x,y,z,xd,yd)
	return x+z*xd,y+z*yd,z
end

function drawScreen()

    -- cleaning screen from sprites added in previous animation frame

    gfx.sprite.removeSprites(drawnSprites)

	-- direction
	local camang=camz*road[camcnr].tu
	local xd,yd,zd=-camang,0,1
	
	-- skew camera to account for direction 
	local cx,cy,cz=skew(camx,camy,camz,xd,yd)
	
	-- cursor, relative to skewed camera
	local x,y,z=-cx,-cy+2,-cz+2
	
	-- road position
	local cnr,seg=camcnr,camseg
	
	 -- previous projected position
	 local ppx,ppy,pscale=project(x,y,z)


     -- array of sprites to draw
    local spritesToDraw={} 
	
	-- draw forward
    for i=1, 30 do
		-- project (turns x, y, z into 3D using a scale)
		local px,py,scale=project(x,y,z)
		
        -- draw road
        local sumct=getsumct(cnr,seg)
        drawroad(px,py,scale,ppx,ppy,pscale,sumct)

        -- add background sprites
        addbgsprite(spritesToDraw,sumct,road[cnr].bgl,-1,px,py,scale)
        addbgsprite(spritesToDraw,sumct,road[cnr].bgr, 1,px,py,scale)
        addNPCsprite(spritesToDraw,sumct,npcSprite,0,px,py,scale)


        --[[ add background sprites to draw
        if (sumct%6)==0 then
        -- left tree
        local tx,ty=px-4.5*scale,py
        local tw,th=1.5*scale,3*scale
        local tscale=0.06*scale
        table.insert(spritesToDraw,{x=tx,y=ty,w=tw,h=th,s=tscale})
        
        -- right tree
        tx=px+6.5*scale
        table.insert(spritesToDraw,{x=tx,y=ty,w=tw,h=th,s=tscale})
       end]]--

        
		-- move forward
		x+=xd
		y+=yd
		z+=zd
		
		-- turn, cnr means corners which are elements from road table
		xd+=road[cnr].tu
		
		-- advance along road, goes trhough segments of each corners and jump to another corner after last segment
		cnr, seg = advance(cnr,seg)

        -- track previous projected position
		ppx,ppy,pscale = px, py, scale

	end 

    -- draw background sprites in reverse order
    for i=#spritesToDraw,1,-1 do
    drawbgsprite(spritesToDraw[i])
    end
end


function addbgsprite(spritesToDraw,sumct,bg,side,px,py,scale)
    if(not bg) then return end
    if((sumct%bg.spc)~=0) then return end -- checks if sprite should be drawn or not
   
    -- find position
    px+=3*scale*side
    if bg.pos then
       px+=bg.pos[1]*scale*side
       py+=bg.pos[2]*scale
    end
   
    -- pico8 calculate size for proper placement
    local w,h=bg.siz[1]*scale,bg.siz[2]*scale
   
    -- flip horizontally?
    local flp=side>0 and bg.flpr
   
    -- set proper scaling
    local tscale=bg.bgscl*scale

    -- add to sprite array
        table.insert(spritesToDraw,{
            x=px,y=py,w=w,h=h,
            img=bg.img,
            s=tscale,
            flp=flp
        })
end

function addNPCsprite(spritesToDraw,sumct,bg,side,px,py,scale)
    if(not npcSprite) then return end
    if ((bg.roadPosition-sumct)<=0) or ((bg.roadPosition-sumct)>1) then return end
    -- find position
    --px+=3*scale*side
    px-=0.1*scale
    if bg.pos then
       px+=bg.pos[1]*scale*side
       py+=bg.pos[2]*scale
    end
   
    -- pico8 calculate size for proper placement
    local w,h=bg.siz[1]*scale,bg.siz[2]*scale
   
    -- flip horizontally?
    local flp=side>0 and bg.flpr
   
    -- set proper scaling
    local tscale=bg.bgscl*scale

    -- add to sprite array
        table.insert(spritesToDraw,{
            x=px,y=py,w=w,h=h,
            img=bg.img,
            s=tscale,
            flp=flp
        })
end


function drawbgsprite(s)
    
    local image = gfx.image.new(s.img)
    local spriteToBeDrawn = gfx.sprite.new(image)
    if s.flp then spriteToBeDrawn:setImageFlip(gfx.kImageFlippedX) end 
    spriteToBeDrawn:setScale(s.s)
    spriteToBeDrawn:moveTo(s.x-s.w/2,s.y-s.h)
    spriteToBeDrawn:add()
    table.insert(drawnSprites, spriteToBeDrawn)
end


function drawroad(x1,y1,scale1,x2,y2,scale2,sumct)

    if(math.floor(y2)<math.ceil(y1))then return end
   
    -- draw ground
    gfx.setColor(gfx.kColorBlack)
    gfx.setPattern({ 0x0f, 0xf0, 0x0f, 0xf0, 0x0f, 0xf0, 0x0f, 0xf0 }) 
    if((sumct%6)>=3) then 
        gfx.setColor(gfx.kColorWhite) 
        gfx.setPattern({ 0xee, 0xbb, 0xee, 0xbb, 0xee, 0xbb, 0xee, 0xbb })  
    end
    gfx.fillRect(0,math.ceil(y1),400, (y1-y2))
    
    -- main road
       local w1,w2=3*scale1,3*scale2            -- start and end widths
       gfx.setColor(gfx.kColorBlack)
       gfx.setPattern({ 0xaa, 0x55, 0xaa, 0x55, 0xaa, 0x55, 0xaa, 0x55 })
       --drawTrapezium(x1,y1,w1,x2,y2,w2)
       gfx.fillPolygon(x1-w1, y1, x1+w1, y1, x2+w2, y2, x2-w2, y2)
       
    -- center line markings
    gfx.setColor(gfx.kColorBlack)
    if (sumct%4)==0 then
        local mw1, mw2 = .1*scale1, .1*scale2
        gfx.fillPolygon(x1-mw1, y1, x1+mw1, y1, x2+mw2, y2, x2-mw2, y2)
        end
    
    -- shoulders
    gfx.setColor(gfx.kColorWhite)
    if((sumct%2)==0) then gfx.setColor(gfx.kColorBlack) end
    local sw1,sw2= 0.2*scale1, 0.2*scale2

    drawTrapezium(x1-w1,y1,sw1,x2-w2,y2,sw2)
    --gfx.fillPolygon(x1-w1, y1, x1+sw1, y1, x2+sw2, y2, x2-sw2, y2)
    drawTrapezium(x1+w1,y1,sw1,x2+w2,y2,sw2) 
    --gfx.fillPolygon(x1-sw1, y1, x1+sw1, y1, x2+sw2, y2, x2-sw2, y2)]]--
   
end

function drawTrapezium(x1,y1,w1,x2,y2,w2)
    -- draw a trapezium by stacking horizontal lines
       local h=y2-y1 -- height
       local xd,wd=(x2-x1)/h,(w2-w1)/h -- width and x deltas
       local x,y,w=x1,y1,w1  -- current position
    local yadj=math.ceil(y)-y
    x+=yadj*xd
    y+=yadj
    w+=yadj*wd 
    while y<y2 do
     -- draw horizontal line
     gfx.drawLine(x-w,y,x+w,y)
           x+=xd
           y+=1
           w+=wd
       end
   end

function roadUpdate()
	--camz+=0.3 -- speed of the car
    camz+=playerCarSpeed
	if camz>1 then
	 camz-=1
	 camcnr,camseg=advance(camcnr,camseg)
	end
end


-- adds and removes speed value which is then used in roadUpdate()
function speedingPlayersCar()
    if pd.buttonIsPressed(pd.kButtonA) and playerCarSpeed<=0.5 then
        playerCarSpeed+=0.03 
    elseif playerCarSpeed>0 then playerCarSpeed-=0.01 
    elseif playerCarSpeed<=0 then playerCarSpeed=0
    end
end


-- car and cat drivers
local image = gfx.image.new('images/car')
local sprite = gfx.sprite.new(image)
sprite:setZIndex(32767)
sprite:setScale(1)
sprite:moveTo(250, 210)
sprite:add()

local i=0

function pd.update()
    gfx.clear()
    speedingPlayersCar()
    calculateRoad()
    roadUpdate()
    npcDrive()
	gfx.sprite.update()
	pd.drawFPS(0,0)
    i +=1
    if i==nil then pd.stop()end
end
2 Likes

Could you also provide the sprites, so that we can test this locally? Thanks!
Hope we'll find the issue :wink:

Here are my sprites :smile:

car
sakura_tree
turn_sign

They are still temporary and to be polished in the future, but the drivers itself are based on these two real persons, haha. :joy:
Koki & Kebi Drivers

1 Like

Here is the full package:
Koko & Kebi Racing.zip (46.5 KB)

1 Like

Okay. Started looking into it. Don't have a solution yet, but I think I know where the problem lays, so I'll share what I've found out so far.
I decided to check the values of the npcCar on each frame, by adding this code to the end of the addNPCsprite function:

print("Scale: " ..tscale .. ", Position X: " .. px .. ", Position Y: " .. py .. ", Width: ".. w .. ", Height: ".. h)

The result was this:

Scale: 0.5699478, Position X: 194.8186, Position Y: 223.6269, Width: 51.81343, Height: 51.81343
Scale: 0.658682, Position X: 194.012, Position Y: 239.7604, Width: 59.88019, Height: 59.88019
Scale: 0.5744121, Position X: 194.7781, Position Y: 224.4386, Width: 52.21928, Height: 52.21928
Scale: 0.6606601, Position X: 193.994, Position Y: 240.12, Width: 60.06001, Height: 60.06001
Scale: 0.5789469, Position X: 194.7368, Position Y: 225.2631, Width: 52.63154, Height: 52.63154
Scale: 0.6707311, Position X: 193.9025, Position Y: 241.9511, Width: 60.97556, Height: 60.97556
Scale: 0.5835539, Position X: 194.695, Position Y: 226.1007, Width: 53.05036, Height: 53.05036
Scale: 0.6727823, Position X: 193.8838, Position Y: 242.3241, Width: 61.16203, Height: 61.16203

This was when also driving (e.g. when the bug showed up).
It's clearly visible that the scale changes from ~0.58 to ~0.67 on each frame, which causes the flickering. No matter the distance to the player sprite, there always seems to be a scale issue like this. The same issue happens no matter the distance the two devices are appart (that being said, the number difference in scale changes based on the distance to the player)

The big question now is why does this happen?
The scale value comes from the project function, so the problem could lay there. However, this specific bit of code in the addNPCsprite function is probably the actual cause of the error:

if ((bg.roadPosition-sumct)<=0) or ((bg.roadPosition-sumct)>1) then return end

@Antares could you explain what you're doing there?

Also big sidenote:
I sideloaded this project onto my playdate and it runs at 4-5 fps and crashes after a few seconds because of an out of memory exception. So you definitely have a memory leak in here somewhere.

1 Like

@PizzaFuel First of all, thank you so much for your time and help :pray:t2: I really appreciate that!

I'm a classic example of a meme person "I have no idea why my code works" so this line of code if my weird way to ensure that for each animation frame the NPC car is being added only once. It checks the difference between NPC car position (bg.roadPosition) and current camera segment position (sumct) but I see instead of that, I could just write:

if not (((bg.roadPosition-sumct)==0)) then return end

Without that line of code I had this issue:

glitch

That memory leak is worrying me though :playdate_tear: Could you check different versions on your device? Here is a zip with version without any sprites around the road at all, only with tree sprites, and third with trees and road signs. All of them without that NPC car. Im trying to figure out when the game got broken by my amateur coding :hear_no_evil:
RacerPack.zip (271.5 KB)

Tested it out:
The versions with trees have the same issue. The version called "RacetNoSprites.pdx"runs with solid 29-30 fps and looks extremely smooth. Let it run for a two minutes, and found no issues with it.

So the issue came when you added the trees. Definitely try to get those working on the playdate first before focusing on the car.

Out of curiosity: Am I right in the assumption that you don't have your physical playdate yet and this is one of your first coding projects using the sdk? (I did see in your posts up there that you didn't have a playdate a few weeks ago, so I assume that's still the same?)

1 Like

I'm still waiting for my device to arrive. I'm 54XXX. Its "processing" right now. And this racing engine is actually my third demo :smile: First two were super simple:

Koko & Kebi Tennis

Koko & Kebi Vacuum Invaders

I want to prototype small games from different genres before I will figure out what I really want to do. Probably super short JRPG like Dragon Quest 1 for Famicom. Racing catches my attention though, as it looks cool, has much retro vibe and I could do a train simulator with that engine.

Also it looks like sprite calling kills the CPU. I was afraid of that :frowning:

2 Likes

Alrighty! That's dope! Really like the look and scale of those two demos!
Looking really cool so far for your third project on the playdate :smiley:

May I give you a bit of advice, as someone who also tried to get pseudo 3d projects runing before they had a physical playdate? (You can take this or leave it. Not here to discourage you.)

I would highly recommend you to wait with developing 3d stuff until your PlayDate arrives. The reasons for that are very simple:

  • 3D Games need a solid working base before you start adding any features: If you have the whole game done and only start debugging it on device at the end it'll drive you mad trying to find the sources of perfomance issues.
  • Debugging every feature once added is very easy once you have your device, but very time consuming if others have to do it for you.
  • If you want to add 3d stuff in lua you need a deep understanding of the SDKs strenghts and weaknesses. Especially around memory and sprite management.

I went through pretty much the same problems you currently have a year ago and learned this lesson the hard way. That's why I'd highly recommend using your current PlayDate-less time creating a ton of smaller projects and getting them working well. Then using that knowledge on your 3d game once you have the chance to freely debug it :wink:
Maybe you can even publish a smaller polished PlayDate game or two on itch to get your name out there!

2 Likes

Thank you! These hints are very reasonable and to be honest, deep in my heart I knew that this pseudo3D is a bit of overkill for a noob, but I'm a "try harder" type :joy: I think I can use part of this code though for some dumber version of Sky Destroyer or Space Harrier. I think it could work better if there were just one cat running endlessly to the horizon, and some tuna cans to collect and get points :joy:
spaceharrier

1 Like

I feel you so much. Same! :joy:
Had the exact same thought back then and eventually made this game, which is pretty much what you're talking about:

1 Like